Showing posts with label CeciMichelena. Show all posts

Thursday, November 21, 2013

Daniela Moran & Ceci Michelena- Week 10: 3D Scan


 These scans are just a selection of the many we attempted to complete. Some of the problems we ran into were: patchy surfaces, jumbled and irregular surfaces, entire sections missing, and so on. An approach we could take to fixing this in the future would be to make sure to place the dots more strategically to aid in accurate alignment.


HAPPY WINTER BREAK!
.... Giant reeses or small girl?

Ceci Michelena Week 10 Shoe Model


To create the design of this shoe, I found inspiration from a slip on loafer. these shoes are very comfortable with fabrics that sit naturally and I thought it would be good to learn to make an object look realistic with adjusting control points.

The tools I used most were loft and offset curve. To add detail I piped the outside of the offset surfaces. I also added a raindrop shape detail to add an asymmetric touch.

Monday, November 11, 2013

Ceci Michelena: Week 8 Tubular Chair


-Inspiration Board-


This piped chair design was inspired from a combination of the pictures shown in my inspiration board. I was very inspired by the flower theme I had used in the ring assignment and chose to apply it to this assignment as well. I also added a table to my scene to complete the setup for rendering. I found a table to model and I made it in rhino.

To model this chair, I started with an ellipsoid that I rebuilt and molded by using the control points. Once I reached my goal shape, I created isocurves from that object to then create the pipes.

The material I chose for the chair pipes was brushed steel and the seat has a cloth material. the table is made of frosted class that I applied an emissive material to.

Tuesday, November 5, 2013

Ceci Michelena: Week 7 Lamp


The design of my lamp was inspired by a handful of lamp designs I came across. I kept my design simple by starting off with a rectangular pyramid, and then I added a twist, literally. 

The techniques I used to make this shape are cube and twist. Then, I created the cylinders and oriented them on the surface to create the slits for construction. I used the split command to make the cutouts, and then using the script, I laid out each layer of the lamp on a 24x48 sheet.

the materials I used in the keyshot rendering are the same as those I will be using to create the model. I will be using a sheet of acrylic plastic and for the layers perpendicular to the table surface I will keep it glossy, and for the vertical layers I want to make them matted.


In preparing this model for lasercuting, I learned how many details need to be accurate in order for optimal construction of the final product. Having the proper thickness of the pipes to cut the surfaces for the slots is key and this is measured based on the material that the lamp will be constructed out of.

Monday, October 28, 2013

Ceci Michelena: Week 6 Ring

-Rendered In Passes-
-Inspiration Board-
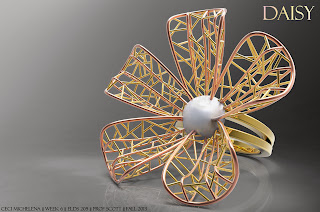
This ring design encompasses the beauty and fragility of a flower. To make this ring, I started with creating the two bands and rotating them slightly away from each other. Next, I created a paraboloid and cut it in half to represent a shape similar to a flower petal. I used the polar array tool to create 5 petals. next, I duplicated the edge and started adding more curves and adjusting the shape. I webbed all the outer skeletons of the petals together and piped them. For the center of the flower, I used the sphere tool. I rebuilt it and adjusted the control points to make a flatter bottom against the ring.

I designed this ring with the intent of using rose gold, 24K gold, and a pearl in the center. For this project I favored the precious metal materials. However, I also showed what it would look like with less expensive materials, such as painted plastic and metal, allowing me to show what the ring would look like in colors more natural to the flower theme.


This is a picture of the ring that was printed on the Projet 3D printer. I had to make a couple changes to my model to make it optimal for printing. I made the pipes slightly thicker to prevent them from breaking. The way I constructed it initially would have been okay for printing, but it would have most likely broken in the bath after printing. The ring is sized accurately for my finger and I did this by matching my size to a ring chart and knowing the diameter in mm. Next, I would like to send my model to Shapeways to get it printed in metal! I love how this ring turned out.

Tuesday, October 22, 2013

Ceci Michelena: Week 5 Glasses


My sunglasses design was inspired by vintage aviators. I chose to go with a theme of Ferrari because it is very suiting to this category of glasses. 

To create the model in Rhino, I imported my orthographic images I had drawn and aligned them appropriately (as we learned in class). I used the offset surface tool a lot to create solids out of surfaces that were already curved. For the gold rim around the lenses I used the piping tool. To create the details of the horse and the lines, I projected curves and extruded/piped them. I added hinge details to the ear pieces to support the idea of the folding sunglasses design.

Because of the vintage theme, I chose to use dark wood as the material for the frames. The details such as the piping around the frames, the horse, and the stripes behind the horse are made of 24k gold to maintain the high status and luxury of a Ferrari. And finally, the name "F205 Scuderia" was inspired by the way Ferrari names a handfull of their cars, such as F40, F50, F12, etc. and I replaced the numbers with our course number (ELDS 205).