Showing posts with label sp2013. Show all posts

Monday, September 23, 2013

Julian Dinsing: Week 1 Castle

                                          Ghosted View
                                          Rendered Pedestrian
                                          Rendered Birds Eye

When I was designing this castle I really had no idea were I was going with it. I just started with one corner and kept adding on. My goal was to create something futuristic, something from out of space.   In order to create this castle I mostly used array and polar array, extrude, mirror, rotate and revolve tools.

Thursday, May 30, 2013

Bamidele Elegbede: USB


I followed the tutorial to create this USB. I leaned how to use bit maps to turn an image into a 3D object. 

Bamidele Elegbede: Camera Week 10


Insta Camera is a camera made specially for Instagram. 


Andrea Banegas Week 9: Shoe

GHOSTED VIEW


RENDERED VIEW


For my shoe design I decided to design a pair of sandals. These sandals are specially made for the beach. They are easy to put in and more importantly they are very comfortable. I chose this color because this way you can combine them with which ever cloth you want. To model them I used curves and extrude them, pipes and the boolean union command. For my material I decided to use leather, but they should really be made with a material that can get wet without ruin them. 

Andrea Banegas Week 10: Camera

GHOSTED VIEW


RENDERED VIEW


      For my camera design I was inspired by the nikon J1. I love white cameras and this is why I chose to render it white. Even though I was inspired by the nikon I still decided to change some aspects of it. My design has some curves towards the front. I created my camera by using curves and then extrude them. Then I used boolean union to make it one piece.  I chose white and black plastic and silver as my material.


Connor Mannina Week 10: Shoe


For my shoe I decided that I wanted to make a wrestling shoe. My inspiration came from a pair of my old wrestling shoes which were my favorite. I followed some of the elements like gold piping around the tongue and the vertical motion the Adidas stripes give the shoe. Even though the original shoes were Adidas I decided I wanted to make mine Nike to switch it up a bit. The bottom of the shoe has special tread to be super grippy. The tongue of the shoe also has a pocket for you to put your laces to keep them out of the way.   

Connor Mannina Week 10: Camera


When i was making this camera I wanted to give the face some complex geometry. I made the lens an oval to slightly distort the picture giving things fort of a fish eye effect. The camera is water proof and is supposed to be designed for some rugged situations. Overall it is a longer camera then most and has a very wide screen to encompass the elongated lens. 

Wednesday, May 29, 2013

Lucia Cozzi: Week 9 Camera Design


Ghosted Images


Ghosted Image with Layers for Keyshot Rendering


Renderings

Render with Orthographic drawings


Render with Isometric drawing


 This camera was designed to be used by tourists or people with a growing interest in photography, but not by professional photographers. The purpose of the camera is that it has automatic control on the settings so that the photographer in entirely focused on his composition and targeted subject. Essentially it is a very simple camera to use with a professional lens. 

To model this design I followed the Rhino manual tutorial. I created my outline curves and created my solid by creating fillets and blendsrf between edges. I made the lens with a curve and then the revolve command. Additional details such as the buttons are cylinders with filleted edges, which I then  incorporated into the main form using the boolean difference command. 

The materials used are chrome, hard plastic and a soft touch plastic. The main body of the camera is made of a hard beige plastic. I chose this material because it would make the camera affordable. The grip around the lens and the buttons next to the viewfinder are made of soft plastic. To enhance my materials I used the oclussion and reflection render passes

Render with image in viewfinder


Lucia Cozzi: Week 9 Shoe Design

Ghosted Images


Layers for Keyshot Rendering: 


Renderings

Render with inspiration sketch


Render with Orthographic Drawings


This model was inspired by a pair of boots by Alexander Wang. My design intent was to develop a pair of boots that could be worn for casual daily look and for a more formal attire. 
To model my design I worked with the tutorial and created the shoe last first. I made the bottom and top curves and then using the snaps continued to make the contours. To create the surfaces I used the curve network and the sweep2 for the sole of the shoe. Once I had the last I used the pull and project commands on curves to create the details of my shoe. I also added stitching to my model, following the orient on curve and array on curve commands. The offset surface command was key to give my form thickness. 

The materials used in my boots are leather and plastic. The main surfaces of the boot are made of leather. The leather on the surface added to the main form is a more specular variation of this material, this is in order for this part to stand out. 
The sole is made out of a hard shiny plastic. Using the Reflection pass in my rendering I made the sole specially reflective in order for it to look as a better quality material. I chose the color black for my design because it is easy to wear with any outfit, which make the boots a good item to purchase. 

Tuesday, May 21, 2013

Bamidele Elegbede: Week 8 Tubular Chair

Pole Seat


The Pole Seat concept is a solar powered light pole with a seat on it. The excess energy  is stored in the pole allowing users to charge their portable electronic devices with the USB ports underneath the seat. Most of all the Pole seat helps bring people together and create new connections. 


Connor Mannina: Week 8 Tubular Chair


Then designing this chair my goal was to make a rocking chair. I wanted to make it very modern and unique as well as comfortable. I think my design is unique because normal rocking chairs have their rockers at a pretty parallel angle and mine not only taper to a point at the back but the rockers continue all the way up and around to create the frame for the chair too. The foot rests are supposed to be able to rotate and lock in a different position to lift your legs for added comfort. The piping is all black chrome and all of the material on the cushions is different colored leather. 


Monday, May 20, 2013

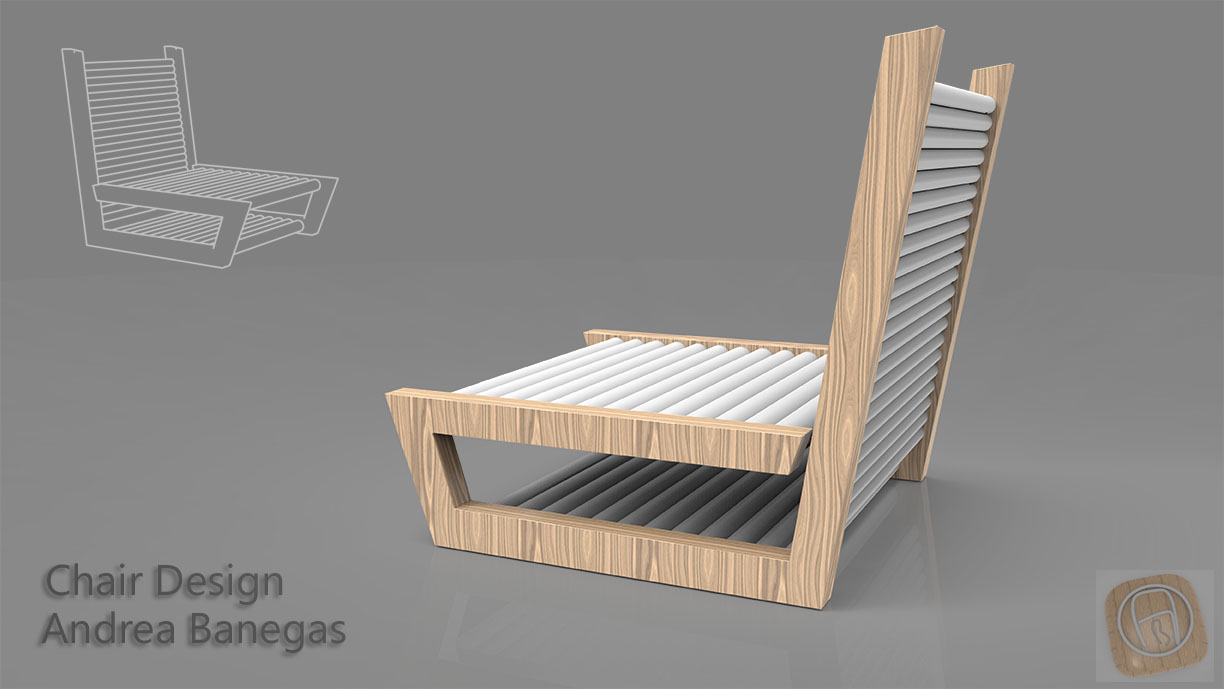
Andrea Banegas Week 8: Tubular Chair


GHOSTED VIEW


RENDERED VIEW


My chair was designed to fit a modern house on a beach. To make the wood part of the chair I first drew a curve and extrude it. Then I made lines and used the pipe tool. For my materials I used wood and soft touch material to give the chair a comfortable look. 


Lucia Cozzi: Week 8 Tubular Chair

Ghosted Image


Renders


My design was inspired by some investigation I did on chairs. In addition, I arrived at this form by  making a connection to the design that inspired my ring model. My chair is intended to look modern, appealing to the public through its intricate form. To make my 'tubular chair', instead of employing the pipe command I used the Sweep1 tool. I created a rectangle with curved corners and used this for the cross section for the Sweep 1 command. The seat and cushion are polysurfaces to which I arrived to through curves and surfaces made with patch and sweep 2 commands. 
My material choices were a hard plastic and  leather. I used a monochromatic color scheme to keep the focus on the form. I chose a hard plastic because of the shinny surface quality it has. To render my designs I focused on the occlusion and reflection render passes.