Showing posts with label week3. Show all posts

Tuesday, April 15, 2014

Shameka Browne-Heskey: Week 3: Mouse

Ghosted image

Front View

Right View


For this project, I wanted to use organic shapes. I also wanted my mouse to be cordless. The shapes that I used remind me of germs of amoeba under a microscope.
The mouse was made from three, vertical and arc-like curves that were lofted, followed by a cut plane for the base. Then, I made the scroll button's cradle by Boolean differencing another sphere from the top of the mouse. The scroll button was made using a simple sphere with a slightly decreased size in that of the cradle for seamless scrolling. Lastly, the button cradles were drawn and edited using the control points to get the perfect apostrophe-like shape, and then mirrored along the x-axis for perfect symmetry. They were Boolean differenced from the mouse's surface and extruded downward. The rim of these cradles were piped for added detail. The actual buttons were created using the same shape, but they were extruded in a slightly longer and upward manner. As expected, all possible edges were filleted for a seamless intersection of shapes. I have four naked edges that I couldn't figure out how to get rid of.
To tie into the scientific, germ-like feeling, I used hard plastic with a glossed green paint for the body of the mouse. The scroll button is a classic, matte black rubber. Lastly, the left and right-click buttons are a hard orange plastic.

Monday, April 14, 2014

Meghan Preiss Week 3 Mouse


      For my mouse design I wanted something that was edgy looking. I created indents for both the thumb and pinky finger. The mouse itself is curved to maximize comfort with the natural curve of one's hand. Where the thumb would rest is a finger print reader. I was inspired to do this by the fingerprint scanner on my iphone.

     I used loft and blendsrf to create the base of my mouse. To create the fingerprint scanner I used the project and pipe commands. I also used booleanunion, boolean difference, and fillet to create my buttons on my mouse.

     I chose to work with gold and black to create a luxury feel. The black mouse with the gold accents uses three different golds to accent each piece. While the gold mouse with the black accents only uses 24K gold. 
    

Nico DeLuca-Verley Week 3: Mouse

 Mouse Ghosted


Ghosted Image

     My mouse was designed to accommodate the curvature of ones relaxed hand. The scrolling mechanism (the green screen) has also been placed so that it becomes the thumb's job to scroll instead of one of the other fingers. I also replaced the two buttons on your standard mouse with a shell that goes over the top of it. To click, simply tilt the shell forward and it responds as a left click; if tilted backward then a right click is enabled. My main focus was to create a mouse that would allow the least amount of effort to accomplish the mouse's job and relieve stress on the hand.

     I had to create two lofted surfaces in the beginning for the body and the shell. Then I used both booleandifference, trim, split and sweep1&2 to create the other surfaces. I mainly used fillets on the body, the bottom of the shell, and the buttons and lever underneath it.

     I used a clear black plastic for my shell and a dark plastic for the buttons and lever. I also used an aluminum casing for the body and the black accents were carbon fiber. Since there is normally a for of laser light underneath your typical mouse, I decided to place a light material on my bottom surface. Then, to  make the scrolling screen seem like it was lighting up, I placed a clear green glass material on the thumb screen. 


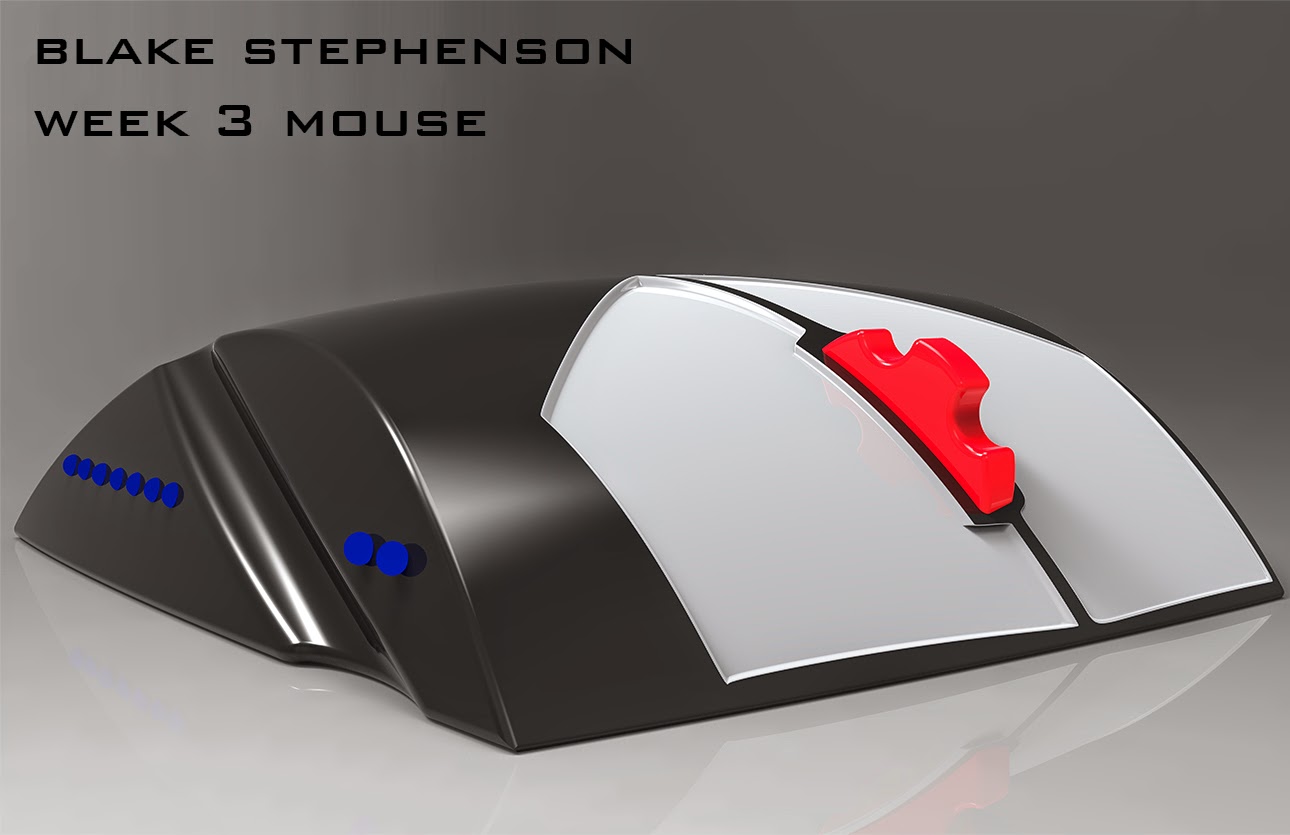
Blake Stephenson Week 3: Mouse


     My design inspirations for this mouse were convenience of a small USB wireless mouse and a trackball mouse.  I wanted to create something that had both of those elements because they both offer different advantages depending on what program you may be using and the amount of free space you have in your workspace.

     The commands I used were Loft, Sweep, CreateSolid, Boolean2Objects, BooleanDifference, Patch, ExtrudeCRV, FilletEdge, Move, Create Polyline, Create Sphere and BlendSRF.

     When I put my mouse into KeyShot I wanted to use materials that would be simple but stand out on a shelf at a store.  I used a hard black plastic for the majority of the house, but the spheres on both sides are little lights that emit a blue color.  The track ball and scroll wheel are red plastic to differentiate from the mouse as well.

Sarah Brodsky: Week 3 Mouse

Naked Edge

Rendered Front

Rendered Side

Rendered Side

The mouse I have designed is to be intended for the use of a child. This concept has been inspired by my own use of the classic Logitech trackball mouse as a child. I wanted to design a smaller and more modern version of the mouse I have used. I have designed it simply to fit the use of most children's computer games. 

I have used several modelling techniques in the making of this mouse and I was surprised to find how simple they can be to use. To create the body of the mouse I created a curve which I then duplicated and rotated to either side, then I used the loft command to create the physical body. To create the trackball's relationship to the body of the mouse I used the BooleanDifference command. I also used this command when adding each of the two buttons to the mouse base. To create the buttons I extruded each of the shapes I had made by the control point curve. Then I used the planar cap holes command to create a surface for each of the buttons.

I chose to use a clear plastic inspired by the first clear plastic nintendo64 controller that I also used as a child. I felt that this material complimented my inspiration and concept. I intended for this mouse to be reminiscent of what I have thought to be classic designs in the technological world. I chose orange as it is a complimentary color of orange. I also thought the orange trackball was playful in that with it's rough texture it resembles the orange fruit. This mouse is meant to be fun and easy to use for children.

Katharina Fuetterer Week 3: Mouse

KeyShot Rendering

KeyShot Rendering

KeyShot Rendering

Rhino Ghosted Image

     For this week's design I was inspired by this mouse. I wanted to create a sleek design with minimal but very functional buttons. Most mouse designs have a very high arched midsection that I did not find appealing. My design has an arch towards the back section but has cut out sections for the thumb to comfortably rest on. Both, left handed and right handed people can use this mouse with ease.
     To create the design I used commands such as BooleanDifference, ExtrudeCrv, Rotate, Loft, Join, Trim Split, BlendSrf, Fillet, PlanarSrf, FilletEdge and more.
     The materials in this design are Polished Aluminum for the body and Matte Paint in the color Jet Black for all the buttons. I wanted the mouse to look as sleek as possible and this aluminum finish did just that. The Jet Black color added great contrast to the bright aluminum material.


Jeffrey Tindi: Mouse Week 3


My design was inspired by the motor company Audi. I wanted a sculptural design so I included the extrusion within the mouse using the Boolean Difference command. I was going for a clean design that comfortable to touch with all the key components to functional mouse. 

The mouse was designed using the fillet edge technique as well as Boolean difference. I added a curve using project then turned it into a thin pipe, Boolean difference which gave me a thin line all around

The materials used were carbon fiber inspired carbon fiber material which is sometimes used on cars. For the sides of the mouse I also used aluminum for the sides for a shiny touch. My purpose was to create a mouse that would comfortable hold with a bit of texture,weight and smoothness. I believe these techniques make for pleasing computer mouse.

Saturday, April 12, 2014

Peyman Pirzadeh _ Week 3 _ Mouse


For the third project we had to model a mouse. After researching different models and design I decided to come up with a very simple design instead of making it very imaginative. 
I tried to use the new techniques we recently learned as much as possible to be comfortable working with them. For the main body which is black I had three curves and used Loft to connect them together. As an option, I chose Closed surface then I drew a plane and cut the bottom part and used Creatsolid to make the whole thing one. I used Filletedge to make the edges rounded and smoother. I also used Sweeper2 for the bottom part to cut, Pipe, BooleanDifference and Project. 
For the material there's Black Hard Rough Plastic for the main part, Red hard rough plastic for part around the scroll wheel and Modeled leather plastic for the two scroll wheels.

Tuesday, January 28, 2014

Crysta Polvinale Week 3: Mouse


The mouse I created is influenced by an arching mouse I saw at a friend's house. Since the front area of the mouse is where contact needs to be made, the middle can loft to the arch of ones hand. I really liked the idea of adding light accents as well. 
In Rhino, I set my curves with the trackball mouse method, but then split the shape to achieve the middle arch. In order to close the bottom after this I used the patch command. I used array polar, a fair amount of mirror, and the project, pipe, and difference commands as well. 
In keyshot I first played with the clear plastics but they were too refractive with the lights. I decided in the end to go with a simple, shiny black that reacted well with the emissive materials . I made the pipe grips emissive as well to bring some interest down the body of the mouse.

    Crysta Polvinale: Week 3 Hammer

    Most hammers are made with a bias towards men so I wanted to create one that would stand out for women. A typical stereotype is that women don't own tools and instead use the next best thing...a heel. I thought this might be the type of hammer a woman would pick out for herself as it embraces the sexier side of hardware.
    To achieve the shape of the heel I created curves and then extruded them. I used a little boolean difference and union to connect the shapes and make cut-outs on the handle. For the grip line on the handle, I used the project and pipe workflow.
    My color choices are based on the Christian Louboutin "red-bottom" heels. I think the red and black make the hammer less girly and more appealing to a wider range of women.

      Laura Matteo: Week 3 - Toy Hammer

      Ghosted View
       Perpendicular View
       Bottom Part View
      Front View

            For this week, we had to model a Toy Hammer. I changed my design three times because I was very insecure of each and they were not a toy, they looked more like a killing device. However, I focus on creating a model based on those little girls that prefer to play with tools rather than dolls. I wanted to keep the feminine aspect by using a pink and red color palette.

            When I imported the file in KeyShot I decided to play around with a pink and red color palette within the plastic materials. Not only I used pink and red, but I also added transparent and grey plastic so it wouldn't look so monochromatic.

            Some new commands I used to create this model were: Sweep2, Project, Pipe, ExtrudeCrv, FilletEdge. Regarding the FilletEdge commands, I couldn't fish a couple of naked edges. The first time I typed in the command it show 908 naked edges. I selected the whole design and used cap and join. I used JoinEdge to fix a couple however I still have some naked edges that I do not know how to fix yet.


      Wednesday, July 24, 2013

      Chrisitna Byun : week 3 mouse

       this is my small mouse,,,i named Jr.mouse... inspiration for this mouse is actually from my first designed mouse 'mouse gloves', which is on the very bottom...it is big and rough so i wanted to minimize the size and the shape. therefore those small and simple shaped mouse created. i tried several colors and it was red, green, and blue with black color base. hope you like it.

      top view


      front view

      perspective view

      close op

      front
      ghosted view

      ----------extra----------
      top view

      side view

      front view