Showing posts with label 2013 fall. Show all posts

Thursday, November 14, 2013

Avi Spratt Week 10: NX310

I own a Samsung NX300 Camera, I love that it has a pocket-able form factor without a lens attached, and that it is like a DSLR in that you can attach a wide variety of different lenses depending on what sort of image is being captured. However, I do not like that there is no optical view finder, and that the user must rely on the digital view finder, which is hard to view outside because of glare.

For this model, I used blend surfaces for the thumb rest and the over-sized ergonomic grip. I built the body using curves and extrusions. I also used rebuild surfaces, and control points to manipulate the curvature and shape. I spent a few hours alone just filleting the thumb wheel, the ISO wheel, the focus ring, and the zoom ring. 

For materials I used a leather pattern moldtech plastic for the outer trim, brushed aluminum for the body, rough black plastic for the back of the frame, lens, and on/off switch. I used a silver plastic for the thumb wheel, the record button, and the capture button.  For the rear buttons I used a darker silver plastic, and rubber for the viewfinder cushion, and focus/zoom rings.


Ghosted


Display

Rendered
Rendered Alternate view


Monday, November 11, 2013

Christian McKenzie - Week 8: Chair


Entente is defined as a friendly informal alliance between to social parties. The name seemed appropriate, I couldn't think of something more friendly then the agreement between my ass and a chair and there are those asses that seem quite stately(pun intended). I was initially draw to a bell form for the legs, it evolved naturally from there. I imagine this chair in the waiting area of an office. With the office in mind, I made the base of the frame flat laterally for the ease of aligning multiple chairs in rows.
I drew my initial inspiration for my logo from the Volkswagen logo (http://www.vw.com/en.html).

Modeling I drew the curves, tubed them, extracted the isocurves, trimmed and then used blend surface. I made a Y joint where the back and the legs meet. I made the cushions by using the planar curve command, rebuilt the surface, adjusted the control points, then used the bend tool to make the cradling contour of the cushions.
 For my logo, I used the same process, but instead of bend I used the cage editing tool in the transform menu.

Materials I chose leather and anodized chrome. I feel that is frequently desired in offices. It is easily cleaned and it is durable. 

Tuesday, November 5, 2013

Matthew Grello: Week 7 Lamp

ghosted w/ ortho view
render wood 2
   

render acrylic, w/ ortho
render acrylic 2, w/ cutsheet 
render wood 1
lamp-off

lamp-on
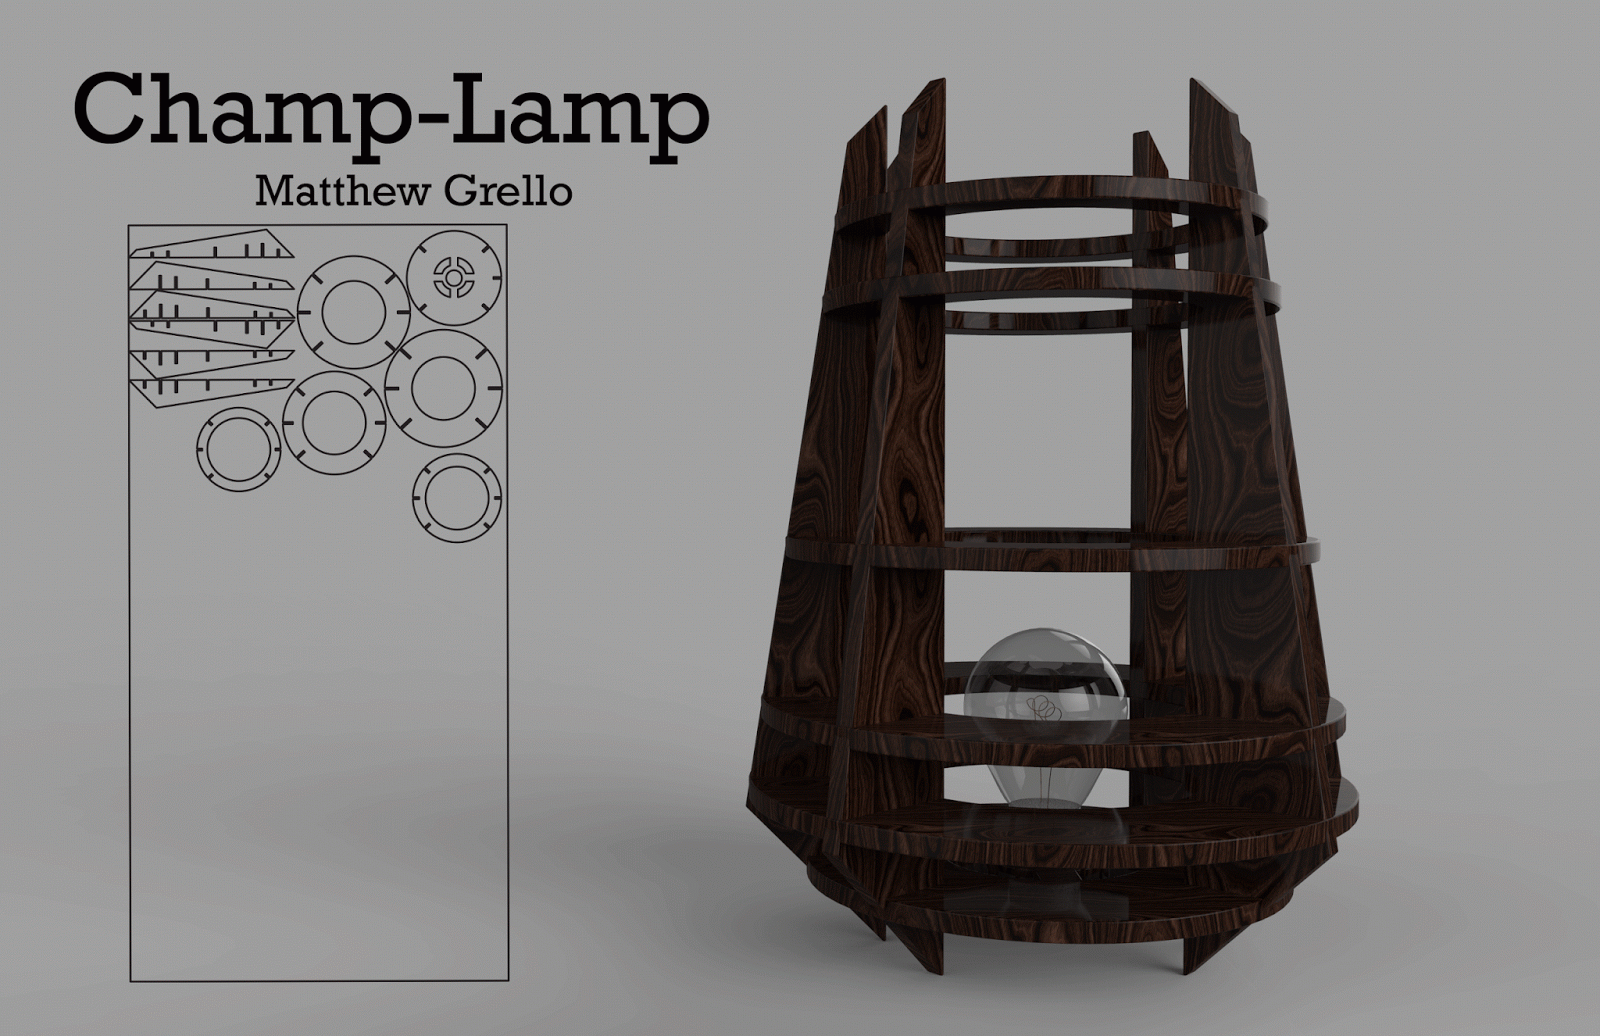
               The lamp that inspires champs, the champ-lamp, designed to be simple and cost-effective, the champ-lamp does it all. When I modeled the champion of lamps, I started with the curve tool in the "front" window, I then drew my curve and used the revolve command. I than used the "section" and "contour" commands the create the curves that would become my surfaces. I deleted the curves I did not want for my design, then I highlighted the curves and did the "Planer curves" command to get my surfaces. I used the command "intersect" to highlight the intersections to pipe my curves. I then piped the intersection curve, moved the end to the midpoint, than repeated so that i had two piped bisecting the curve. I then repeated this  process on all the curves. Then using the pipes I split the surfaces to get my notches, then ran the massive unroll to create my cutboard.
             In keyshot I wanted my lamp to live up to the name, so i used that sexy plexi glass, alternatively, I could use a black walnut, equally sexy and available. For the light bulb I used glass for the bulb, and used area light for the filament, I then tweaked the settings until I got the desired glow, much like my idle, Bruce Leroy.

Nick Tourville- Week 7 Lamp


   As can be assumed from the title, my lamp was inspired by a comet shooting crashing the atmosphere. I created a bulbous bottom and extended, pointed tips and added a tilt to really emphasize this inspiration. There's a higher concentration of contour pieces towards the bottom to to block out light towards the actual "comet" of the lamp, leaving the "tail" to be the more greatly lit up area.
    During the modeling process, I mostly followed the instructed steps of contouring and sectioning my basic shape, piping my intersections, and splitting the pipes and sections and contours. However, I used control point to give extra shape to my sections and, after tilting my entire form using the gumball, used a straight line to trim my form to create a flat bottom. The lasercutting layout was created using the BetterMassiveUnroll script, and thanks to some early scaling, there were no problems getting the parts to fit in a 48x24in box. After all my piping was complete, I extruded my contour and section surfaced from both sides to ensure a uniform look for the Keyshot model. I also added a wire and bulb for the Keyshot model.
    I chose a smooth Oak material for the contours of the lamp. The sections are a Red Oak to represent the fiery tail of the comet. The actual lasercut lamp will be made of a red-tinted plywood. I chose a warm lighting to compliment my woods for the lit keyshot image, and the wire is a soft plastic.

Laser Cut:


Monday, November 4, 2013

Christian McKenzie - week 7: Lamp


When thinking of radial patters I immediately visualize fruit, watches, and mechanical components. I looked to these things to guide me in my design. I chose a strawberry and a sprocket. I added a perforated pattern as strawberries have seeds on the exterior, to keep the mechanical aspect I made these cutouts round. I came up with a basic gear design and filleted the edges in order to keep the organic properties of a fruit.

In Rhino I used the curve tools to make my horizontal intersections. I measured my hand and devised an interior circumference that seemed I could fit my hand into fit my hand into.  I made the curves into surfaces using the planar curve command in the surface menu. I made the outer curves of the vertical sections by using the horizontal layer for guidelines drawing in the front view. I used offset curve, array, and curve Boolean to make the perforation. I then used the polar array and planar curves to make my vertical intersections. I used pipes and split in order to make the notches in the sections.

In Key shot I chose wood for the vertical sections, I tried to enhance it by adding a bump pattern and making adjustments various adjustments mostly to the contrast, scale of the pattern. Wood has an organic warmth that this more mechanically arrangement needs. I then used a metallic paint on the horizontal sections. The metallic material as an accent puts more emphasis on the interior forms. Without the Metallic, the horizontal layers become easily interpreted as a cylindrical visual mass, or a heavy base, in the rest of the design.


Tuesday, October 29, 2013

Christian McKenzie - Week 6: Ring Model


Many of my friends back home in Detroit are into a Funk Style dance called popping. They really like things that represent or allude to the dance style. As this is a style that get's little publicity compared to other hip hop related arts it is rare that something is made specifically to their preference in dance without with out the inclusion of another style, such as b-boying.
I wanted to make a product for my friends, the people who inspire me and I love to watch and draw.
I chose a simple chrome material for my ring. I feel that additional materials might take away from the over all design. I also wanted a more sophisticated and designed appearance as this appeals to the group I am orienting it.


I built a basic shell of the shape I wanted using network surface. I looked up the for a size 7.5 ring and drew a curve to represent the interior of the ring. I then drew 3 curves 2 mm from the interior as reference using the quad snap. I used these reference curves and the end snap a points for arcs. i drew two straight curves from the end of each of my lateral arc curves. I used the tangent curve to make the tapered shape I wanted for the shell and outline and did a curve from 2 views. I drew interior curves through theses three curves connecting them and used the network surface to make the surface. i used rail sweep to make the lateral surfaces. I then used fillet on the edges. To hollow the ring I made a copy and scaled it 3d. I used the control points to warp the base of the ring and did a Boolean difference. I duplicated the hard edges and piped trimmed and used 2 rail sweep to remove the hard edge. 
I used the text tool and and arranged them so they intersected, I took only the negative shapes using  boolean curve. I extruded the negative shapes of the text curves and used pipe, trim, and blend surface, or sweep 2 to round where the objects would be Booleaned out of the ring. It was time consuming, with alot of trial and error, to make sure all of the corners that would be made from the Boolean difference were filleted.
I then piped and trimmed the edges of the text that the Boolean had left in the the ring. I used sweep 2 rails to remove the edges around the text.