Showing posts with label oliverfilley. Show all posts

Monday, November 4, 2013

Oliver Filley: Week 7 Lamp

Ghosted

Lights On


Lights Off


Jet Engine


light on


light on
light on


Light off

Light off

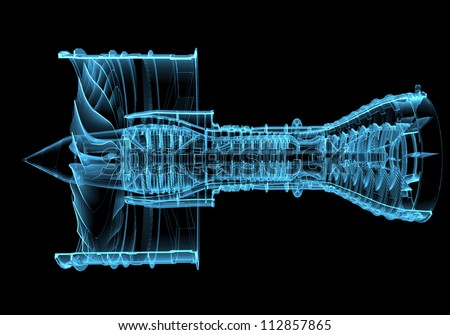
For my lamp I was inspired by the design and shape of jet engines. I set out to create a lamp that would somewhat resemble the structure of these machines. I found many pictures to help guide me like the one above.

 I started by using the picture frame command in rhino to import the picture of the jet engine above. From there I traced half the image and made adjustments to the shape to make it suited for a lamp design. I then revolved and offset the image to get my base shape. After that I created horizontal and vertical sections which I then ran the intersection curves command on. After finding all the intersections I made pipes and block commands and snapped all the pipes to the intersection lines. After all the pipes were set I split the pipes and the surfaces creating the laser cut images of the lamp with the help of the massive unroll script. From there I extruded the models to the proper thickness for the 3d model.

In keyshot I chose a clear plastic with a brownish bronze tint to resemble the material I will build my lamp out of (bronze acrylic). I used render passes along with custom keyshot environments to create the lighting and effects for the product. For the custom environments I used the three overhead lights option then used the HDR settings to modify the brightness and contrast along with the angle and tilt of the lights.


OliverFilley Fall2013 elds205 lamp

Tuesday, October 29, 2013

Oliver Filley: Week 6 Ring

Ghosted
Layers
 
Render 1


Render 2

3d Printed Ring
3d Printed Ring On
For my ring I set out to create a simplistic, clean looking, unisex ring. I wanted to create a very simple and minimalistic band with a little bit of styling. I drew inspiration from a start-up I have been working on for the past year called Salt Sports. Salt Sports is a watersports company so I wanted to create a ring that would have a nice slow to it. The Band of the ring was created from parts of the logo of Salt Sports.

To create the ring I started by taking the Salt Sports logo and doing a trace in illustrator. From there I imported the trace and did a curve 2 view of the lines. I then patched and offset the patch. After that I filleted the edges and created a solid text. For the text I attempted to fillet the edges but this led to many naked edges even with a very low fillet setting(.001). I also tried a pipe and blend but that also led to a number of naked edges. As a result the letters are not filleted.

In keyshot I chose a stainless steel for the ring band and a painted stainless steel for the lettering since that is an available material that shapeways offers. To render the image I used a materials 2k lighting and played with the HDR file then worked in render passes in photoshop making several different layers to create the image.


OliverFilley Fall2013 elds205 ring

Tuesday, October 22, 2013

Oliver Filley: Week 5 Glasses

Orthographic Drawing
Isometric drawing
Ghosted

Ghosted with drawings
Naked edge 1
Naked edge 2 and 3

Keyshot layers


Keyshot Render 1 
Keyshot render 2


For my glasses I drew inspiration from a couple different areas. Immediately when I thought of designing glasses I thought of Oakley and started looking through their extensive list of sunglasses. I set out to create a large profile sunglass for male teenagers from teens to twenties. I looked at different styles of Oakley's such as the Oil Rig, Style Switch, Big Taco, and the Jupiter line. The name and inspiration for these large profile glasses came from the planet Saturn. It is one of the largest planets in our solar system. The casual style of the glasses came from the fact the Saturday is named after Saturn so I wanted to bring in a little bit more of a casual, walk around, weekend feel to the product.

To create the glasses I used many different methods in Rhino. For the lens of the glasses I used curve to view commands to create the curved profile from side to side then I drew cross-section curves and patched the surface. After that I extruded and filleted the glasses. To create the front frames I used curve to view again along with patch and extrude. Then I boolean differenced the lenses from the frame to create and interchangeable lens. After that was done I used pipe and blend commands to fillet the surfaces. To create the stems I used curve to view, offset, blend and boolean commands along with fillets and chamfers. To create the hinges I used booleans, along with offsets to create hinges and housings. In the modeling there were 3 naked edges I was unable to join. I tried cap, join, join edge (which worked for several) and pipe and blend.

In Keyshot I chose to use mainly plastics to keep the objects light weight and durable. For all the plastics I played around with the material settings to take away the roughness and make a smoother surface. For the lenses I changed the advanced settings such as specular, and diffuse to create a colored transparent lens that had a glossy almost mirrored look. For the environment I worked with the stock environment and edited the hdr files so create a scene that would suite the glasses.

OliverFilley Fall2013 elds205 Glasses

Tuesday, October 15, 2013

Oliver Filley: Week 4 Detergent Bottle

Ghosted


Layers for Keyshot

Keyshot Render 1

Keyshot Render 2

For my detergent bottle I wanted to make a bottle that would feature a lot of cutouts and contrasting colors. To create the bottle I used sweep, Boolean 2 object, Boolean difference, fillet, and offset. For the cap I wanted to create a cap that would be easy to put on and take off so I went with a snap cap design. The top of the bottle has sharper edges to allow it so slide and snap into place.  In Key shot I used a combination of hard plastics to create the bottle in order to keep cost down and provide durability.

OliverFilley Fall2013 ELDS205 Detergent Bottle

Tuesday, October 8, 2013

Oliver Filley: Week 3 Hammer


Ghosted

Layers for keyshot

Keyshot render 1

Keyshot render 2


For the hammer I was inspired by the idea of transforming the hammer from a heavy looking industrial tool into a light and playful kids toy. To create the hammer I used Loft for the head along with boolean 2 object, rebuild and boolean difference. Once the hammer was created I used chamfer and fillet to round off all the edges. Some edges I chose to round off more than others to still keep a basic feel of a real hammer. In Keyshot I added lots of different clear plastic colors to give the hammer a interesting look when light hit it. The clear plastics refract the light as it comes in and gives the hammer a playful feel. I also added a rubber grip on the back so that the hammer does not slip out of a child's hand as easily.

OliverFilley Fall2013 elds205 Hammer

Oliver Filley: Week 3 Mouse

Layers for Keyshot

Ghosted


Keyshot Render 1

Keyshot render 2

Keyshot render 3


For the mouse I was inspired by a combination of gaming mice and simplicity. Gaming mice are very complex and have several buttons so I set out to simplify a gaming mouse into two buttons and a scroll wheel yet still looking flashy. The mouse features several glowing areas in the track wheel and in the body along with a glowing mouse face in the back. To create the mouse I used loft and sweep to create the body along with boolean 2 objects and boolean difference to create the light channels and the buttons. I also used fillet to round off all the sharp edges. In keyshot I applied a simplistic black plastic for the body of the mouse along with blue accent buttons and lots of blue glowing lights.


OliverFilley Fall2013 Elds205 Mouse


Monday, September 30, 2013

Oliver Filley: Week 2 Duck

 Ghosted

Keyshot Render 1

 Keyshot Render 2

 Keyshot Render section with water

Keyshot render in environment

For the transformation of the duck I chose to connect the duck with its habitat in the water. Rather than creating just a toy rubber duck I decided to have the duck house water and act as a tea kettle. To create the duck I used boolean difference to hallow out the middle of the kettle and the spout. I also used a lot of rebuilding of the forms to add points to drag and modify the objects to make all the parts of the kettle. In Keyshot I used a metal for the for the body and the spout of the as it would be in contact with boiling water. I made the stopper ball and handle rubber coated so that it can be handled even after being in contact with heat.
Background image

OliverFilley Fall2013 elds205 Duck

Oliver Filley: Week 2 Flashlight

 Ghosted

 Keyshot Render 1
Keyshot Render 2

3d Printed Flashlight

3d Printed Light On

3d Printed Light On


For the flashlight I set out to create a simplistic shell that could provide a housing for a dull design. I wanted something fun and playful and found inspiration in Crayola Crayons. I selected this theme because it allowed for a wide variety of color options for personalization. To create the flashlight I used techniques such as Boolean difference and polar array to create a hollow shell with some texture in it. In Keyshot I used a hard plastic for the colored parts of the casing because it was a cheap and durable option and offered many different colors. For the grip I used a neutral soft grip material for comfort. I also included a series of rubber balls on the bottom inside to provide a gripping for the inserted flashlight.

OliverFilley fall2013 elds205 flashlight

Monday, September 23, 2013

Oliver Filley: Week 1 Castle

Ghosted

Birds Eye

Pedestrain 
For my castle I drew influence from several Gothic cathedrals throughout Europe. This design features a more minimalistic building with a greater focus on the columns. There are several different columns throughout the castle, the goal was to make each set of columns different. For inspiration for the columns I studied Gothic structures along with current and concept design from the United Arab Emirates, specifically Dubai. To create the castle I used a lot of the 3d form tools and extrusion to create the basic structures. Then went back and applied polar arrays and rotations to create repetition especially in the columns and the dome.


OliverFilley Fall2013 elds205 Castle