Monday, September 30, 2013

Jamie So Whi Lim: Week 2 Flashlight


 I have an icon of an eye on my flashlight. I chose to have an eye icon because flashlight helps you to see better in the darkness. I wanted my flashlight to have details, but look simple. I used a lot of lines for the eyes, lots of shapes such as spheres or cylinders, extrudecrv, join, and so. I chose chrome, hard plastic, and 24k gold for my materials.


Jamie So Whi Lim: Week 2 Ducky


This is a soap container. I chose to go for the soap container because duck relates to water and soap relates to water, also. I put some flowers around the ducks head to make it look like it smells good just because it is a container for soap. I used rebuild, and moved the control points around. I used bend and extrudecrv a lot. For material, I chose shiny plastic, hard plastic, and ruby for the eyes. 

Andres Poch: Week 2 Rubber Ducky

This speaker was inspired by one of the speakers that my sister used to own. Basically what the speaker does its that it transmits the sound waves from the bottom of the product through rubber onto any conductive layer, for example a table or a window. This wave transfer allows for the whole layer to become a speaker and produce sound. On the top of the product there are two heat sensitive buttons to adjust sound, and on the frontal part there's another heat sensor that turns the product on and off. Finally, in the right side, there are two plugs to connect the power source and the audio input.

The main commands that I used for this model were: project curves to make the bill and and the buttons, and pipe with boolean difference to create the rubber unions between the buttons and the plastic. and between the plastic.

Rubber Disk View


Left Side View


Right Side View


Layers View


Rendered View


Ghosted View


Naked Edges View

Morgan Lewis: Week 2 Duck


Ghosted

Keyshot Rendering #1

Keyshot Rendering #2


Inspiration 

http://www.woodentoyshop.co.uk/blog/mental-and-physical-development-with-wooden-toys/29

I was inspired by the old wooden toys that kids used to play with such as the image above.  I chose to go with a more sleek, fast design, resembling a spaceship because the old design was to plane and boring. I chose the colors to slightly resemble a common duck but not to much where it is replicating it.

Andres Poch: Week 2 Flashlight

For the flashlight I wanted to design a case that would look good 3D printed and as an actual product. The whole purpose was to create a playful case that would be useful to hold a flashlight and would also make use of the light being generated. The owl concept comes from the fact that they are night birds and are used to see in the dark, so with this case the owl allows you to see in the dark. This product is mainly composed with extruded and rotated lines to create a more organic and natural design. 

This product is composed by three materials. First, the hard shiny plastic that creates the body and the head of the owl, which provides protection to the flashlight and allows for the color to shine. Second, a translucent white plastic is used in the eyes

3D Printed Prototype


Lights Off View


Lights On View


Layers View


Ghosted View


Naked Edges View


Rendered View


Ana Soto: Week 2 Flashlight

 Ghosted
  Render 1


Render 2


 I started exploring with a marine inspired design, but later decided to go for a children's design. I did the ducky project first, and decided to go for a simple children design too.  I started by creating the basic flashlight of the tutorial, and later I draw and revolve a curve around it. I also, used boolean difference to add details. In key shot I decided to use plastic, because it is a design for kids.

3D Rapid Prototyping


Oliver Filley: Week 2 Duck

 Ghosted

Keyshot Render 1

 Keyshot Render 2

 Keyshot Render section with water

Keyshot render in environment

For the transformation of the duck I chose to connect the duck with its habitat in the water. Rather than creating just a toy rubber duck I decided to have the duck house water and act as a tea kettle. To create the duck I used boolean difference to hallow out the middle of the kettle and the spout. I also used a lot of rebuilding of the forms to add points to drag and modify the objects to make all the parts of the kettle. In Keyshot I used a metal for the for the body and the spout of the as it would be in contact with boiling water. I made the stopper ball and handle rubber coated so that it can be handled even after being in contact with heat.
Background image

OliverFilley Fall2013 elds205 Duck

Oliver Filley: Week 2 Flashlight

 Ghosted

 Keyshot Render 1
Keyshot Render 2

3d Printed Flashlight

3d Printed Light On

3d Printed Light On


For the flashlight I set out to create a simplistic shell that could provide a housing for a dull design. I wanted something fun and playful and found inspiration in Crayola Crayons. I selected this theme because it allowed for a wide variety of color options for personalization. To create the flashlight I used techniques such as Boolean difference and polar array to create a hollow shell with some texture in it. In Keyshot I used a hard plastic for the colored parts of the casing because it was a cheap and durable option and offered many different colors. For the grip I used a neutral soft grip material for comfort. I also included a series of rubber balls on the bottom inside to provide a gripping for the inserted flashlight.

OliverFilley fall2013 elds205 flashlight

Christian McKenzie - Week 2: Flashlight

      For assignment 2:flashlight I sought to model a flashlight that would have a base diameter wider than the top. Most flashlights are designed cylindrically with a wider diameter at the face where the light emanates. When I am given a cylinder I instinctively want to set it on one of the cylinders ends, specifically the end opposed to the light. My flashlight is designed to stand on the cylinders base so the light faces upright.

      My design is influenced heavily by Celia Torvisco and Raphaël Pluvinage's work HIBOU- Gilded ceramic radio (featured here: http://vimeo.com/67895730). 
Rhino Modeling Techniques:

  1. All of the Modeling Aids with base curves for snaps 
  2. Revolve for overall shape
  3. Project Curve(very effective for surface embellishments and trimming.
  4. Mirror
  5. Array (to create repetitive line work)
  6. Trim (To contour my repetitive curve patterns into a specific shapes)  
  7. Extrude Pipe with rounded caps
  8. BooleanDifference
  9. Fillet curve
The Materials:
  1. Lens Cap: Heavy frosted glass. (To allow some concentration of light as well as allowing some peripheral luminescence for aesthetic.) 
  2. Grip and Button: Grey Leather. (The texture brought a very nice contrast to the gilded surface on the shaft. to enhance the texture I edited the material scale and the lightened highlight color.)
  3. Shaft: White Marble ( I slightly augmented the luminescence and the scaled the texture. The curvilinear pattern complimented the ridged gilded surface.)
  4. Gilded Surface Engraving: Silver Leaf ( I like the idea of inlaying metal to enhance a surface.)
  5. Base: Rubber (I changed the color to grey to coincided with the Grip and Button. I chose the material for its skid resistance.)
 Thank you,
Christian McKenzie


Marcelo Torres: Week 2 Flashlight

Ghosted View, Edge Analysis

Ghosted view with layers
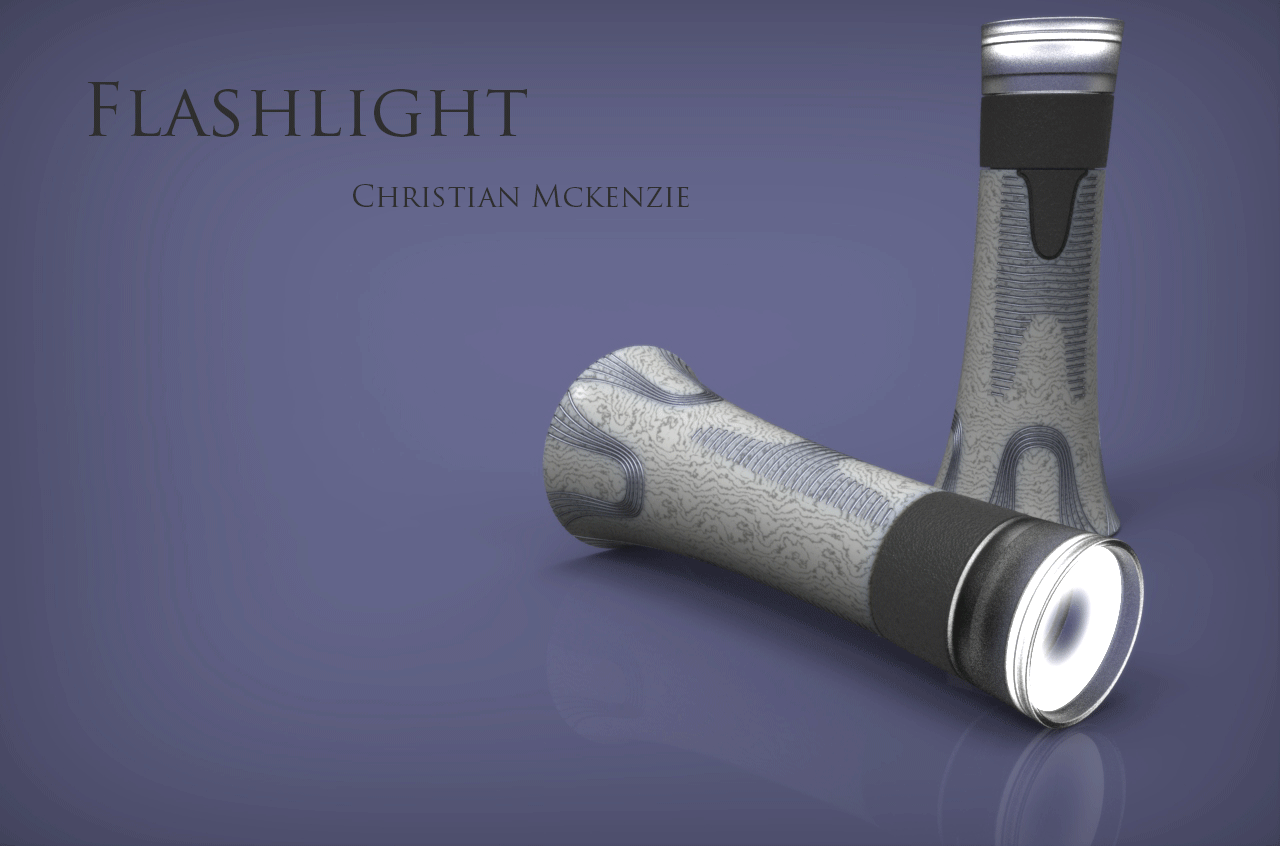
Rendered View 1

Rendered View 2


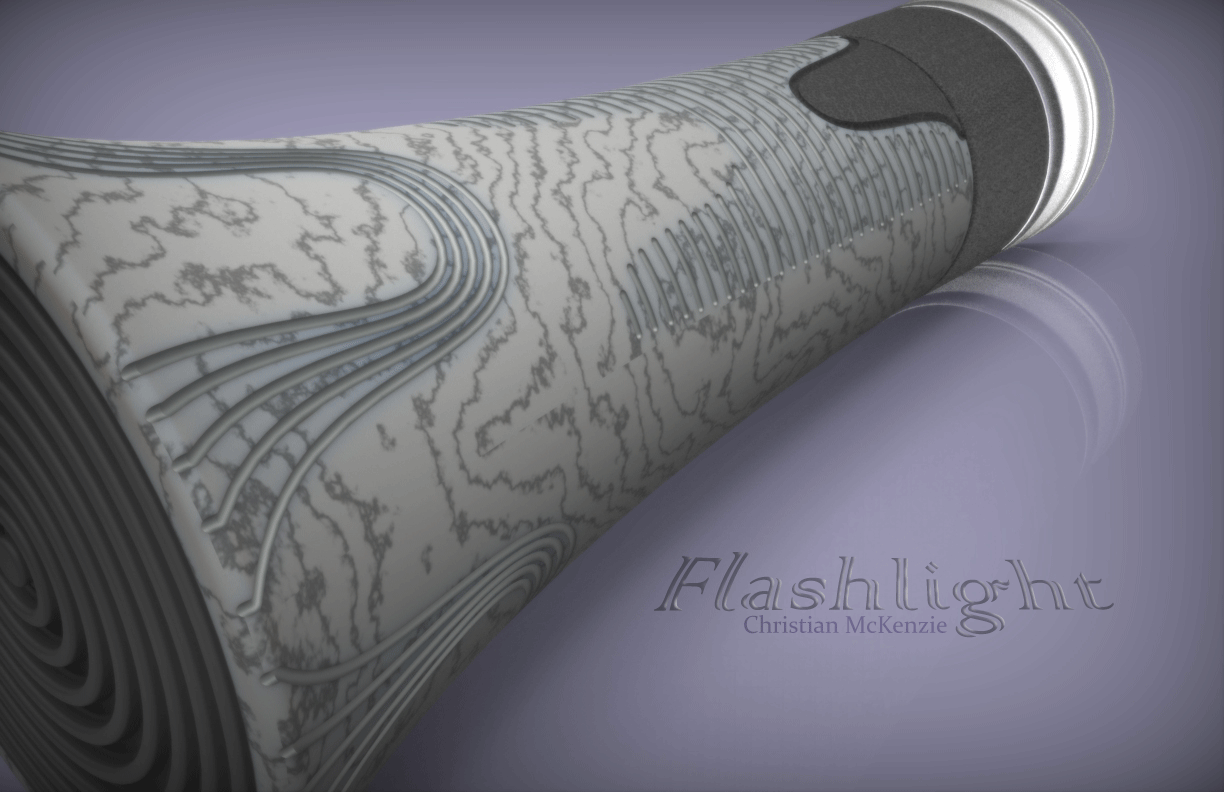
For my flashlight, I tried that all of the decorative elements were based on the circumference, so most of the objects are cylindrical or spherical.I did so because I wanted to experiment with organic shapes for the flashlight design in order to give it a smooth look.
For the design, I used techniques such as revolve, project, join, group, the boolean commands, etc. I also did some editing using the control points. 
The material of the body of the flashlight is a DuPont material; I used it because it gave the model the smooth look I wanted to achieve. For the other parts, used both polished black walnut and light oak.  For the button on the back I used leather, which also adds smoothness to the design as a whole, in combination with the other elements. 
For lighting, I turned down the brightness to make the light from the flashlight stand out more (ground illumination turned on). Ground shadows and reflections were also turned on.