Tuesday, March 4, 2014

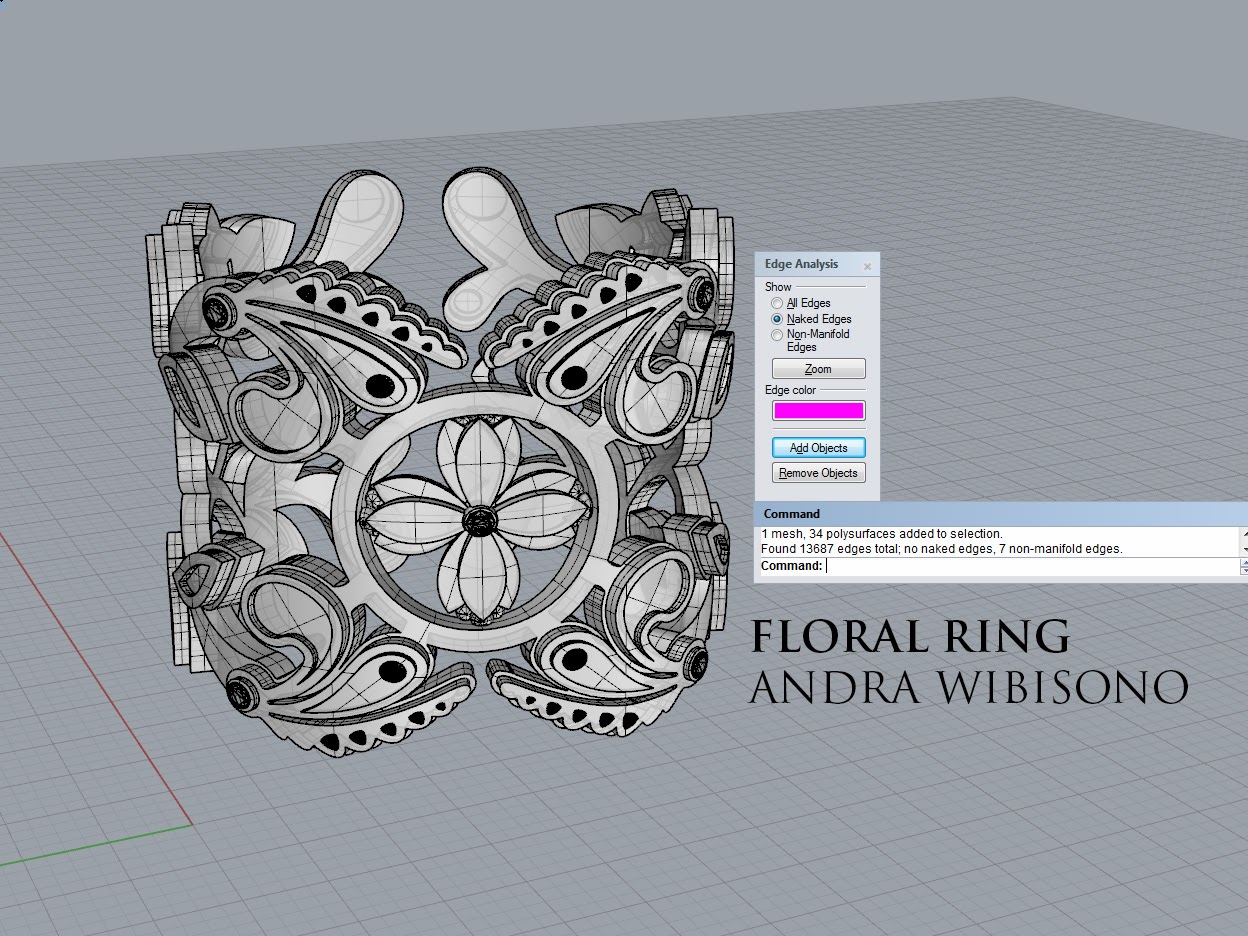
Andra Wibisono: Week 6 Ring


This ring design was inspired traditonal indonesian patterns called batik. I created my own pattern using illustrator which I then imported as a dxf to rhino. I wanted to create a ring that was intricate and elegant.

I exploded my dxf file from illustrator in Rhino. Using the curves, i generated extrusions from these curves. I then used the flow along surface command to flow the pattern around my ring design.

Using Keyshot, I applied a gold material to the ring. I also applied diamonds to the gemstones of my ring. I adjusted to refractive index to get my diamonds to shine and refract more light.

Jace McDill Week 9: Long Bow Lamp


I weighed a assortment of different options while deciding on a design for my lamp. I landed on this design because i found that i liked the look of a standing lamp that could be placed anywhere versus a lamp that needs to be hung. After looking at a good amount of examples from the blog i decided on this elegant recurve design that i feel could accent any room.

I followed the typical process used to create the waffle form. I started with my solid and created the interior space. I then used the section tool to create each individual piece. The snaps and the intersections allowed me to create pipes along the line in order to accurately create notches for the building process. I finally used the bettermassiveunroll script in order to lay out the pieces for the laser cutting

My material in my keyshot rendering was the walnut wood because it most closely resembled the lauan that i chose to build my lamp out of. I used lauan becasue i liked the wood look and lauan was fairly cheap and it allowed for the appearance that i desired. Can i just say there is no better smell than freshly laser cut lauan in the morning.

Tim Hardin: Week 9 Lamp


For this project, I wanted to create a lamp that resembled a splash (more specifically a splash of light). To create the shape of the lamp, I drew an initial curve and revolved it, added multiple taurus' around the outside of the object, and boolean differenced a cylinder through the middle for the hole to fit the socket. I also used the bend tool to form the shape exactly how I wanted it to look. 

To create the ribs for laser cutting, I used the section tool, pipes and trim tool, and finally the unroll script that was provided. In keyshot, I used the light oak material for the wood, and adjusted the colors so it resembled the local color of the wood I have purchased for the actual lamp. I also used an area light and then turned it up to around 100 watts so that it would create a nice glow.

Creighton Mann: week 9 Lamp


         For my lamp design I went with a stylish desk lamp. My design started with making a simple circle and base. The light will be placed in the center of my lamp in the circle, creating a very distinct look. My lamp is being lazer-cut so it can be pieced together. The wood I chose is sheathings wood. I choose this because of its light coloring and soft texture. I chose this wood because I thought the light would bounce off it very well.


Ryan Gilllam: Week 9 Ahi Lamp


This lamp design was inspired by contemporary oceanic art.  The final form is very reminiscent of a campfire.  Thus, I named it "Ahi", the Hawaiian word for fire.

Once the initial solid form had been created I used the contour tool to create the curves.  Then I created the surfaces using the surface from planar curve tool.  The vertical surfaces were drawn as a separate curve.  They we're multiplied and oriented radial with the polar array feature.

The material of the lamp is a highly polished rose wood with and ash texture added.  I used the warm light for the bulb to look like a home incandescent bulb. 

Maria Samperio: week9 lamp


The Seed lamp's design elements consists in placing horizontal slices more tight at the bottom and  the top, thus for the vertical panels are placed denser in one side of the diameter of the overall shape. A light bulb would go inside a 4" hollow panel that would fit the arm to change and adjust the lightbulb. the lamp would hange from a celing or can be a stand lamp aswell it can be modify depending on the surrounding spaces.

On rhino I created an ellipse 4x4 inches and elongated 8 inches long, Then I contour horizontal curves then I patch them and for the vertical slices I project on the ellipse shape curve join it with the align center curve to create a surface then pollar array the surface panels. After places some pipes for the nutches.

For the materials selection I went with a more natural look that's why i choose wood and place the lamp kit on the top or bottom of the lamp. For the background i choose a more green pale surrounding to go with the organic natural theme
bare and  leguminous theme.

Kathrine Clark: Week 8 Goblet Lamp


Week 8 Project
Lamp

My inspiration for this project was botanical forms. I wanted to recreate the curvy linear shape of the goblet tulip. It had great movement in space and worked well as a lamp.
To make the lamp I revolved a petal and then made the vertical and horizontal surfaces. I piped them but had difficulties with the notches. So, I then used cut my ribs. Although I had to correct the ribs that appeared on the incorrect sides, it was still a better option.
The colours selected are typical to this flower. The light inserted via cylinder was a soft touch. The chipboard used was selected due to the minimal amount of rigidity as I wanted the lamp to look delicate. Once printed the lighting I use will also be soft to create the affect intended.  

Brian Kuo: Week 8 Lamp


For this project I did not have any immediate inspiration for my project. When I thought about it a little more, I realized that it would be useful to me if the light emitted a warm set of colors so I could relax better before bed. The form and colors used in this piece reflect this decision.

To create the horizontals of the lamp, I drew out a cross section curve then revolved it. I then used the contour and section commands to create my horizontal and vertical sections. Lastly, I selected the intersections, piped them, and split them from the rest of the lamp.

My choice of materials was painted wood. I chose this to give it some extra visual excitement when the lamp is off. When this project is laser printed in real life, I may actually paint the lamp these colors.

Lydia Batchelder: Week 7 Lamp


Thunder and Lighting 
When you just have that itch to curl up and read a good book or take a restful nap, Thunder&Lighting  provides the ideal light environment. Pair this lamp with the sounds of a rainstorm for an ultimate relaxing experience in your own little soothing world. The warm light set in a cool shade provides a beautiful natural balance to any room as the grey tones mix and blend.
 
To create the effects I desired I used a sphere and turned on control points to get the outline of the form. In order to get the proper layers for laser cut I had to use contour and section numerous times. After the fourth time cutting, adjusting, and re-cutting my ribs  I feel that I gained a concise mastery of the process. i experimented in Keyshot with my materials and their textures.

Materials could be quite flexible for this project as long as they stay true to the color scheme of many shades of grey. for my rendering I have chosen grey plastics: one with a metallic paint surface and the other a matte grey. the bulb is bubble shaped to mimic the exterior form. the light bulb stand is beautiful brown and cherry wood to bring an element of the natural world  directly into the design.

Juan Sebastian Moreno: Week 9 Wafle Lamp

First Development 
 Birds Eye View
 Front View
Details Focus
 Final Model
Final Model

Starting by creating the 5 first designs, I was very anxious on what type of shape and design should I start off. By having a little of practice with them, I thought of what better way to portrait a design base on my country's cultural crafts. Colombia holds one of the most popular museum of gold from our natives. Hence, I was strongly influence by the "Quimbaya Poporo" which is one of the most famous pieces in the museum. This is a device used by indigenous cultures in present and pre-Columbian South America for storage of small amounts of lime (mineral). It is constituted by two pieces: the receptacle, and the lid which includes a pin that is used to carry the lime to the mouth while chewing coca leaves. Since the chewing of coca is sacred for the indigenous people, the poporos are also attributed with mystical powers and social status. In addition too, I've also incorporated a square pattern  along the vertical surfaces to intensify its Pre-Columbian culture.

As for my design techniques, I first started by creating a surface that could represent my idea, I was successful by drawing lines and then using a sweep 2. Next, using the contour and section command in order to reproduce my horizontal and vertical curves. Once that was achieved I later made them into surfaces by using the curve tools command and then planar surfaces. Second, I started to load the rhino scrips in order to create my cut ribs. Finally, I design the rectangle pattern and later oriented on each horizontal surfaces with I later trim to gain the fully design.

Finally, my choice materials include Black walnut wood and creating some passes by using the color setting and introducing environmental material to produce a good ambient light. In last, I really happy with the outcome of my design, although it took many hours to accomplish I'm proud that I'm representing my route, my culture! "Que Orgullo ser Colombiano"!!!