Showing posts with label Matteo. Show all posts

Thursday, March 13, 2014

Laura Matteo: Week 10 - Tubular Chair


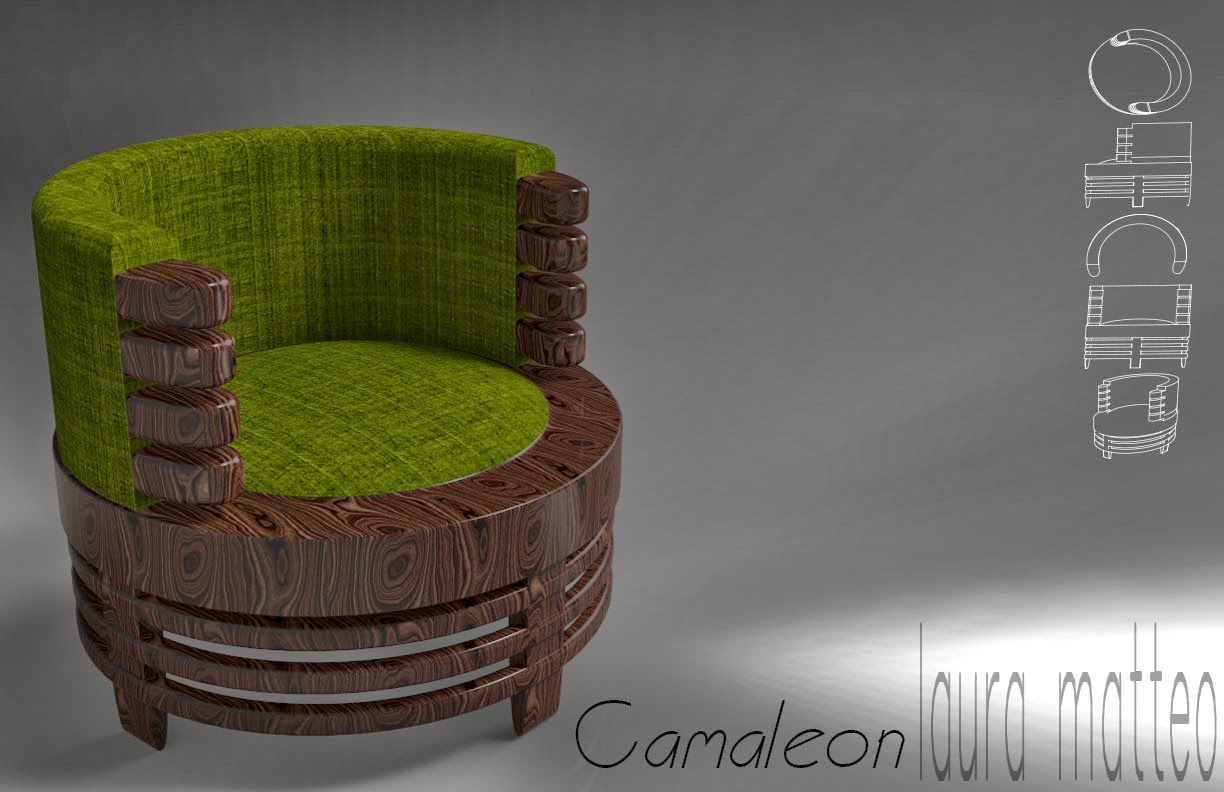
I decided to model one of my many different designs: Camaleon. This chair is from one collection  where I was inspired by different animals. I called this Camaleon because thanks to the shape of the chair the person sitting is able to curl up like the tale of this exotic animal.
While modeling it I had some trouble with the filleting so I extrude everything, join certaing objects and fillet the edges that I found the most important.
I am still having trouble with the lighting in KeyShot. I better start watching some tutorials. Furthermore, I choose Black Walnut Polished, and Cloth - Lime #1.

Tuesday, March 11, 2014

Laura Matteo: Week 5 - Glasses

 Kathrine Clark's Drawings
Kathrine Clark's Drawings
Rhino File
Perspective View
Top View
Side View
 
      For the glasses I had the chance to model Kathrine Clark's Glasses. As you can see in the drawings, the glasses are meant to be for horse riding. I didn't understand the idea of the glasses after I modeled them. Kathrine explained me that the glasses were supposed to only cover the eyes (it is shown in the first drawings), they were not supposed to have a frame. I did them like this because I was confused by the drawings and I thought that it would go well with the market. 
     I modeled the glasses thinking of its functionality, I thought that horse riders will need glasses that would hold really well to their heads and that is why the frame is open so it fits behind the ears. Also, Kathrine designed the glasses so they could fold and snap. 
    When I started it on Rhino, I began by placing the pictures with the command Picture Frame, and then just trace the right side of the drawing with the Curve command. After tracing everything, I converted the curve into a PlanarCurve, Trim the curve, and then Extrude it to make it thick. To create the little holes, I just used cylinders and did a BooleanDifference. When I was done, I just mirrored the right side of the glasses. To create the object in the middle so it could fold, I just used to boxes and cut them with a diagonal cutplane.
      In KeyShot Iwanted to used brown and blue colors because I feel that they would look good with their outfit howevere all of the brown colors were too brights and I wanted the glasses to have a very edgy style. I decided to go for the black and grey color palette with some white edges.

Friday, March 7, 2014

Laura Matteo: Week 3 - Mouse


Laura Matteo: Week 6 - Ring


      For this model I wanted to based my design on organic shapes, and that is why I choose to make it look like the branches of a tree. I enjoyed the design because it is very simple, however I decided to add some leaves to give something else to it. (and also because I want to see how that works and looks when it is 3-D printed, even though I still don't know if it's going to work). 
      I believe I did a better job with the lighting on Keyshot this time. My favorite view is the first rendering because of how the light hits the ring and it reflects it on the surface. The materials I choose were Purple Haze and Raging Ruby of the Axalta Folder.

Laura Matteo: Week 9 - Lamp


       For my final laser cut lamp I choose the first concept. I fixed what was wrong with the first file: I added the horizontal sections, the hole for the light bulb and also I added an offset for the vertical sections so it could actually work. Again, for this concept I was inspired by flower patterns and I based the lamp design on a chandelier. To create the vertical sections, I trace different flower patterns and created one whole pattern, I scanned that pattern and with the curve command I trace the outlines, made it a Planar surface, and to create the inner cuts I traced the curves and then trim the unwanted section to make a hole. After I finish the design, I used ArrayPolar.
     I am still having trouble understanding Keyshot. I believe that my set is not the strongest one because it doesn't look like if the light is coming from the light bulb but it is coming from another source. Something that I also notice, is that I never extruded my Planar Curves so that is why all of the sections have the thickness of a sheet of paper.

Tuesday, February 25, 2014

Laura Matteo: Week 8 - Lamp


      For my first concept, I was inspired by a flower pattern and a chandelier and I want it to be a hanging lamp. I trace different patterns and mixed them to have this final piece. I scanned the drawing, used the Curve command to create the object, and to make the holes I trace the pieces with the Curve command and then the Trim command to create the holes. When my object was done, I did an ArrayPolar. The only two things that I forgot to do for this concept is to leave a space in the center for the light bulb and the horizontal sections.
      For my second concept, I wanted to go for a floor lamp. I did the same process that I did for my first concept: I drew the design, scanned it, but instead I used the Polyline command. I do not believe that this would be my strongest concept maybe because I am not a big fan of geometric shapes, I like more organic shapes. I also forgot to leave some space for the light bulb however I did my horizontal sections.
     The third concept was based on branches. I wanted this lamp to be a wall lamp so that is why I decided to create a base for the branches. I had other different ideas but on my opinion this idea is very strong and eye catching. For the branches I just searched on Google images for a variety on branches this time I traced them on Rhino with the Curve command.
      I based my last concept on a levitating lamp. The procedure for this was very simple, just different size spheres. I was thinking of using fishing line to hold the structure. What I like the most of this concept are the open spaces where the light bulb will be located.

Tuesday, February 11, 2014

Laura Matteo : Week 4 - Detergent Bottle

 Ghosted View
 Ghosted View
 Perspective View
 Top View
Close Up View

      My main purpose of this project was to base it on its functionally. Whenever I'm doing laundry, I get extremely irritated by how hard it is to grab the bottle when they don't even have a handle, or if they have the handle they don't have the curvature for the fingers, or when I have to wait more than five minutes to wait for those last drops of detergent to slide off the bottle. I enjoy doing laundry, but I wish I wouldn't have to get exasperated every time. Now, with this new design, my life as a college student couldn't get any better. It is light weight, it has a handle bar with the curvature for the fingers, and also, the unique heart shape makes the detergent slide off faster. 
      In KeyShot, I got caught up with the plastic materials and choose a very vibrant color palette to give it a sparkle of freshness but without making them look boring. I decided that both bottles should have something that would related them: the two yellow stripes, that's right! Also, I just scale down the big bottle and created a smaller one because it looks adorable. 
     I would have to say that I didn't have any struggles with this model until I had to used the FilletEdge command with the curves that I used with the Sweep2. At one point, the curve was separated, I don't know what I did wrong however I used the command Pipe to make them look like the others FilletEdges.