Showing posts with label Mouse. Show all posts

Tuesday, April 15, 2014

Shameka Browne-Heskey: Week 3: Mouse

Ghosted image

Front View

Right View


For this project, I wanted to use organic shapes. I also wanted my mouse to be cordless. The shapes that I used remind me of germs of amoeba under a microscope.
The mouse was made from three, vertical and arc-like curves that were lofted, followed by a cut plane for the base. Then, I made the scroll button's cradle by Boolean differencing another sphere from the top of the mouse. The scroll button was made using a simple sphere with a slightly decreased size in that of the cradle for seamless scrolling. Lastly, the button cradles were drawn and edited using the control points to get the perfect apostrophe-like shape, and then mirrored along the x-axis for perfect symmetry. They were Boolean differenced from the mouse's surface and extruded downward. The rim of these cradles were piped for added detail. The actual buttons were created using the same shape, but they were extruded in a slightly longer and upward manner. As expected, all possible edges were filleted for a seamless intersection of shapes. I have four naked edges that I couldn't figure out how to get rid of.
To tie into the scientific, germ-like feeling, I used hard plastic with a glossed green paint for the body of the mouse. The scroll button is a classic, matte black rubber. Lastly, the left and right-click buttons are a hard orange plastic.

Melissa Shuford: Week 3 Mouse

Ghosted Image
 Rendered Image
Rendered Image
Rendered Image

For this design I was inspired by the idea of a mouse that I would like while using Rhino. I put in the normal left click, right click, and a track instead of the scroll but then I added two buttons farther down that would become a replacement shift key on the left and a control key on the right.

For this project I used rotate, extrude surface, booleandifference, fillet, 2DScale, POn, POff, CurvatureGraph, Trim, Loft, curve, cap planar holes, pipe, as well as a few other commands.

For rendering my piece, I chose to use rough anodized aluminum for most of it and change the colors to different blues while the trackball I used smooth anodized aluminum. I chose these as they would be durable and also because I had a preset palette of blue that I wanted to use and I knew the color was the same as the anodized blue aluminum.

Mickey Mouse - Emily O'Brien: Week 3


Ghosted Image
Render One
Birdseye View
Back View

For this project I wanted to make my mouse child friendly. Kids these days can pick up on technology faster than most generation, I chose Mickey Mouse because almost all kids I know love Mickey and Minnie. 
I used the cylinder and Boolean Difference tools to create the mouse ears. I added game controllers to the ears because most of the time when kids are using the computer its for games, this gives them an additional controller to play rather than just a mouse.  For the eyes I projected an oval onto the mouse itself, used the pipe tool to create an indent and then added an extruded curve. The left and right eyes are the left and right click buttons. For the nose I took a solid oval object and the Boolean Difference tool to place it in the mouse. In the middle of the mouses' nose I added a scroll key. I used the solid cylinder object for the general shape, then used the array polar tool with 11 extruded rectangles to create the notches in the scroll. I added the smile for detail by using a polyline curve and the pipe tool
For the materials in this Mickey Mouse, I used a variety of clear and cloudy plastics in black, white and shades of black. I chose plastic because it gets dirty less (from kids fingerprints) and most kids toys are in a plastic material due to the fact that they are inexpensive to replace if broken and are fun for kids to play with.

Monday, April 14, 2014

Savannah Sears: Week 3 Mouse

 Rendered

Ghosted

For my mouse design I decided to do something ergonomic. The curves of the tutorial mouse reminded me of a mouse I had and really liked so I kept with those similar curves. I also did not want to overload the design with too many details to take away from the sleek shape.

While designing my mouse I used commands like cut plane and create solid to create the general shape. I decided to fillet the edges of the body instead of sweep2-ing the major ones to keep the design sharper than the example. I also used the pipe commands for all the details; in one detail I boolean differenced it and in the other I left it as a solid pipe. I used the array polar and boolean difference commands to create the scroller, as well as fillet edges.

For materials I chose plastics and rubber. I chose a modeled leather plastic for the body of the mouse because the mouse I had similar to this had a smooth but slightly textured plastic material for it's body and I really liked that. I chose a hard shiny plastic in a light grey-blue color for the scoller to contrast the body of the mouse both visually and texturally. Finally, I chose rubber in a blue-grey color for the pipe detail to act as a grip as well as compliment the color of the scroller.

Meghan Preiss Week 3 Mouse


      For my mouse design I wanted something that was edgy looking. I created indents for both the thumb and pinky finger. The mouse itself is curved to maximize comfort with the natural curve of one's hand. Where the thumb would rest is a finger print reader. I was inspired to do this by the fingerprint scanner on my iphone.

     I used loft and blendsrf to create the base of my mouse. To create the fingerprint scanner I used the project and pipe commands. I also used booleanunion, boolean difference, and fillet to create my buttons on my mouse.

     I chose to work with gold and black to create a luxury feel. The black mouse with the gold accents uses three different golds to accent each piece. While the gold mouse with the black accents only uses 24K gold. 
    

Nico DeLuca-Verley Week 3: Mouse

 Mouse Ghosted


Ghosted Image

     My mouse was designed to accommodate the curvature of ones relaxed hand. The scrolling mechanism (the green screen) has also been placed so that it becomes the thumb's job to scroll instead of one of the other fingers. I also replaced the two buttons on your standard mouse with a shell that goes over the top of it. To click, simply tilt the shell forward and it responds as a left click; if tilted backward then a right click is enabled. My main focus was to create a mouse that would allow the least amount of effort to accomplish the mouse's job and relieve stress on the hand.

     I had to create two lofted surfaces in the beginning for the body and the shell. Then I used both booleandifference, trim, split and sweep1&2 to create the other surfaces. I mainly used fillets on the body, the bottom of the shell, and the buttons and lever underneath it.

     I used a clear black plastic for my shell and a dark plastic for the buttons and lever. I also used an aluminum casing for the body and the black accents were carbon fiber. Since there is normally a for of laser light underneath your typical mouse, I decided to place a light material on my bottom surface. Then, to  make the scrolling screen seem like it was lighting up, I placed a clear green glass material on the thumb screen. 


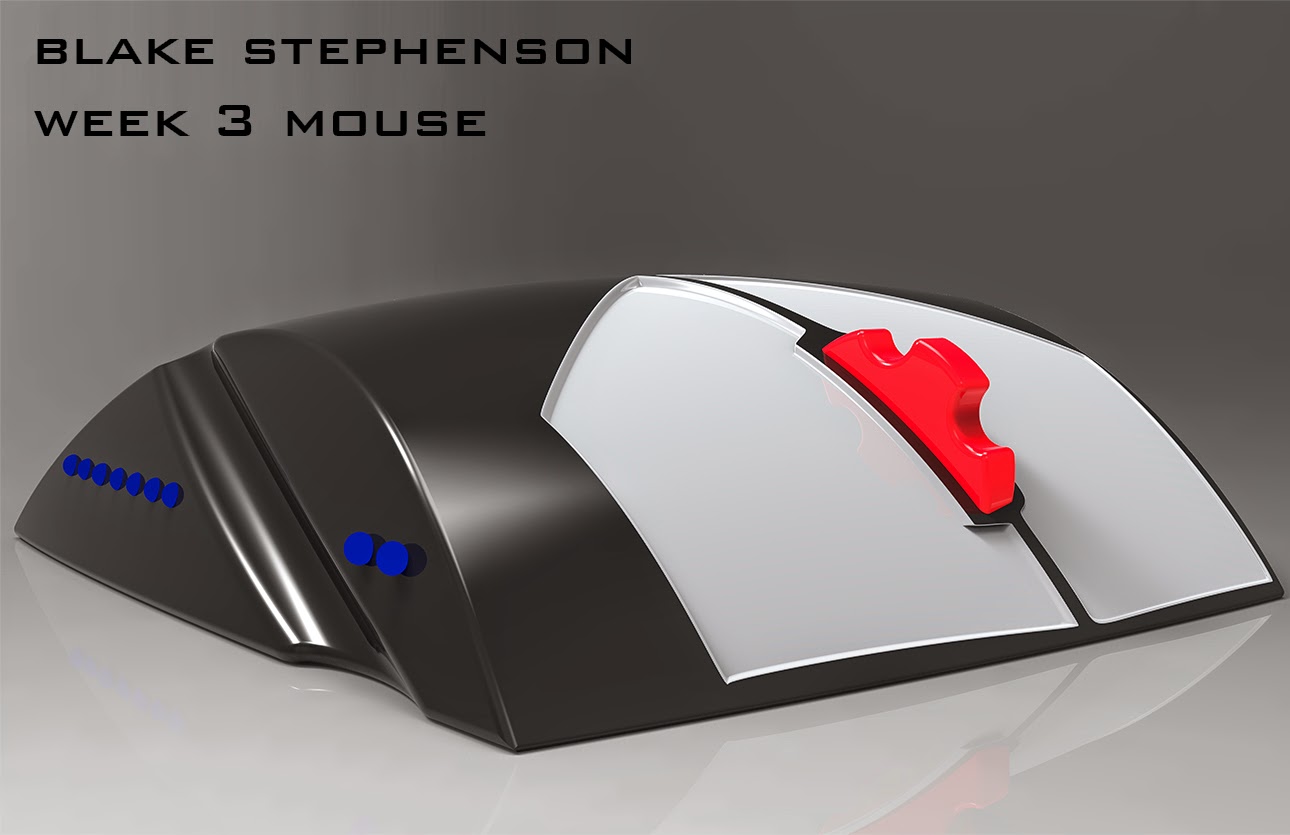
Blake Stephenson Week 3: Mouse


     My design inspirations for this mouse were convenience of a small USB wireless mouse and a trackball mouse.  I wanted to create something that had both of those elements because they both offer different advantages depending on what program you may be using and the amount of free space you have in your workspace.

     The commands I used were Loft, Sweep, CreateSolid, Boolean2Objects, BooleanDifference, Patch, ExtrudeCRV, FilletEdge, Move, Create Polyline, Create Sphere and BlendSRF.

     When I put my mouse into KeyShot I wanted to use materials that would be simple but stand out on a shelf at a store.  I used a hard black plastic for the majority of the house, but the spheres on both sides are little lights that emit a blue color.  The track ball and scroll wheel are red plastic to differentiate from the mouse as well.

Rafael Kader : Week 3 Mouse

Ghosted Image
 Rendered Image 1
Rendered Image 2

My model was basically inspired in a Batman's classic car mixed with some characteristics that I like in my own mouse. I started this project trying to create something comfortable to use and also with a shape based in a car. As a result, during the whole project I was looking for smooth curves and ergonomic design.

I made the mouse body's design using some curves to create surfaces and then using the command CreateSolid. Moreover, I mainly used commands such as Split and Move Face to edit faces in order to get a smooth surface, Project, Pipe, Boolean Difference, Fillet Edge, and Mirror to create the details .

The materials that I used in this project are hard black plastic for the body to make it looks like a Batmobile, carbon fiber for the scroll, aluminum for the pipes and buttons, and shining yellow plastic for the front detail.


Sarah Brodsky: Week 3 Mouse

Naked Edge

Rendered Front

Rendered Side

Rendered Side

The mouse I have designed is to be intended for the use of a child. This concept has been inspired by my own use of the classic Logitech trackball mouse as a child. I wanted to design a smaller and more modern version of the mouse I have used. I have designed it simply to fit the use of most children's computer games. 

I have used several modelling techniques in the making of this mouse and I was surprised to find how simple they can be to use. To create the body of the mouse I created a curve which I then duplicated and rotated to either side, then I used the loft command to create the physical body. To create the trackball's relationship to the body of the mouse I used the BooleanDifference command. I also used this command when adding each of the two buttons to the mouse base. To create the buttons I extruded each of the shapes I had made by the control point curve. Then I used the planar cap holes command to create a surface for each of the buttons.

I chose to use a clear plastic inspired by the first clear plastic nintendo64 controller that I also used as a child. I felt that this material complimented my inspiration and concept. I intended for this mouse to be reminiscent of what I have thought to be classic designs in the technological world. I chose orange as it is a complimentary color of orange. I also thought the orange trackball was playful in that with it's rough texture it resembles the orange fruit. This mouse is meant to be fun and easy to use for children.

Christian Edwards Week 3: Mouse


My mouse was inspired by the form of the human hand.  I tried really embrace how the hand naturally rests when put on a flat surface, and how the hand naturally holds an object like a stone.  Even more that that, I designed a mouse that I could see myself as a consumer using.  

To create this mouse in Rhino, I used commands such as: loft, cap planar holes, fillet, extrude, boolean difference, trim, and rotate. 

The materials I decided to use were cloudy plastic for the buttons and the scroller, and hard and shiny plastic for the mouse itself.  I wanted it to feel as professional and advanced as it could as well as being relaxed and playful. Anybody could purchase this mouse; from the business man to the school teacher, to the child, etc.

Katharina Fuetterer Week 3: Mouse

KeyShot Rendering

KeyShot Rendering

KeyShot Rendering

Rhino Ghosted Image

     For this week's design I was inspired by this mouse. I wanted to create a sleek design with minimal but very functional buttons. Most mouse designs have a very high arched midsection that I did not find appealing. My design has an arch towards the back section but has cut out sections for the thumb to comfortably rest on. Both, left handed and right handed people can use this mouse with ease.
     To create the design I used commands such as BooleanDifference, ExtrudeCrv, Rotate, Loft, Join, Trim Split, BlendSrf, Fillet, PlanarSrf, FilletEdge and more.
     The materials in this design are Polished Aluminum for the body and Matte Paint in the color Jet Black for all the buttons. I wanted the mouse to look as sleek as possible and this aluminum finish did just that. The Jet Black color added great contrast to the bright aluminum material.


Calvin Mai: Week 3 Mouse


     For my mouse design, I really took inspiration from an Orca (Killer Whale). I really wanted to create an ergonomic mouse that flowed and emulated the shape of the whale; the curve creating the image of a tail at the end while the head of the whale is emulated in the front. The whole design is based on an ergonomic mouse, so that the curve of the hands would sit nicely on the mouse.
     For my mouse, I used Loft and Sweep2 to create the initial shape, then used the CreateSolid command to make it solid. After that, I used a combination of Split, Cage Edit, PlanarSrf, ExtrudeSrf, Array Polar in the scroll wheel; lots of Pipe and Diff, and a lot of Fillet and Fillet Edges to get all the curves.
     For the materials, I wanted to create a smooth, easy to grip, soft yet sexy ergonomic mouse, so I used SnowStorm axalta Paint changed to plastic, a Soft Rough plastic for the scroll wheel for grip and comfort ability in scrolling, and a hard rough plastic for the outside to provide grip, and to provide a nice texture to put your hand on. For the final stripe accent along the back, I used a simple hard shiny plastic that I customized the color to the user's preference

Jeffrey Tindi: Mouse Week 3


My design was inspired by the motor company Audi. I wanted a sculptural design so I included the extrusion within the mouse using the Boolean Difference command. I was going for a clean design that comfortable to touch with all the key components to functional mouse. 

The mouse was designed using the fillet edge technique as well as Boolean difference. I added a curve using project then turned it into a thin pipe, Boolean difference which gave me a thin line all around

The materials used were carbon fiber inspired carbon fiber material which is sometimes used on cars. For the sides of the mouse I also used aluminum for the sides for a shiny touch. My purpose was to create a mouse that would comfortable hold with a bit of texture,weight and smoothness. I believe these techniques make for pleasing computer mouse.

Saturday, April 12, 2014

Peyman Pirzadeh _ Week 3 _ Mouse


For the third project we had to model a mouse. After researching different models and design I decided to come up with a very simple design instead of making it very imaginative. 
I tried to use the new techniques we recently learned as much as possible to be comfortable working with them. For the main body which is black I had three curves and used Loft to connect them together. As an option, I chose Closed surface then I drew a plane and cut the bottom part and used Creatsolid to make the whole thing one. I used Filletedge to make the edges rounded and smoother. I also used Sweeper2 for the bottom part to cut, Pipe, BooleanDifference and Project. 
For the material there's Black Hard Rough Plastic for the main part, Red hard rough plastic for part around the scroll wheel and Modeled leather plastic for the two scroll wheels.