Showing posts with label JamesBlakeStephenson. Show all posts

Thursday, May 29, 2014

Nico DeLuca-Verley and Blake Stephenson: Week 10 Kite


     Our Delta kite was designed to include pieces of the flags from our home state. On the left wing, the kite is decorated with 11 stars. Since Nico is from Rhode Island, the right side of the flag includes an anchor and a little flag at the bottom that says hope on it. Blake is from North Carolina so the right side includes a large N and C that lay beside the anchor. The color scheme we used includes the all American red, white, and blue. Then the panels include a golden yellow, black, white, and a lighter blue as well. 

     Our kite was assembled by the instructions that professor Scott sent to us.

     The materials we used were...

Monday, May 19, 2014

Blake Stephenson: Week 7 Willis Tower Lamp


     I drew inspiration from the Willis Tower in Chicago and my love of rectilinear figures, however I put my own spin on it.  The front wall leaning outwards is my interpretation of the SkyDeck hanging over the street.  I also just wanted a very straight edged form, because I feel like that is the most modern look and that is a style that I like.

     The commands that I used were very simple.  First, I drew a single curve and then I extruded that curve to create the 3D solid that I used to create the sections.  I also used the Cylinder, BooleanDifference, BooleanUnion, and FilletEdge commands.  Then, to create the individual layers and vertical supports for my lamp I used both the section and contour commands.

     The materials that I used in KeyShot were a Light Oak wood for the sections of the lamp and then a 100W area light.  I increased the scale of the wood to better display that this lamp would be cut out of a large sheet of wood, and then I play around with the lighting to create the desired effect within the lamp.

Thursday, May 8, 2014

Blake Stephenson: Week 6 Ring


   The ring that I designed was inspired by my love of the water and my love of fishing.  I put on there a slogan that really drives me as well as many other to fish as hard as you can.  There are also two boats and two sets of over lapping fish hooks on the ring.

     I mainly built my ring in 2D by using the extract surface and UV Curves to get a flat surface from the face of the ring to work on.  I also made lots of curves and used mirrors, copy, move, scale and a few others.  I used the Text Object function to create the 3D lettering on the ring and I used ExtrudeCRV to extrude the boats and the hooks.  The bars on the back are simply rectangles that I alt-tapped to create an exact copy of the first one.

     I rendered these views with a few passes.  I used a diffuse pass, an occlusion pass, and specular pass and then a pass that really brought out the reflections on the ring.  The materials that I used were for the ring itself black chrome.  Then for the lettering and bars on the back I chose a 24K Matte Gold to give it a different look from almost anything else that is available in terms of jewelry today.  For the boats and hooks I used a hard gray plastic because I wanted to differentiate between them and the ring but also not give it to much of a pop.

Monday, April 28, 2014

Blake Stephenson: Week 5 Sunglasses


     I wanted to create a pair of sunglasses that were big and would cover the majority of the consumers face.  While I myself do not wear big sunglasses in today's world larger sunglasses are very popular.  I also wanted the arm to at least partially cover the side of the eye so the glare doesn't creep in behind the lens as it would on a similar frame such as the Ray Ban Wayfarer.
     When I began modeling these glasses I began by using a Crv2View to achieve the curvature of the front of glasses that I desired.  Once I got the curve I wanted I extruded that curve into a solid to create the front of the frame.  Then, I drew the curve I wanted to one of the arms and mirrored it to have an identical arm on the other side.  Finally, to create the lens draw a plane and trimmed it using the opening in the frame and extruded that surface.
     For materials in KeyShot, I decided to keep it relatively simple.  For the front of the glasses I used a smooth black plastic, and for the hinges I used polished aluminum.  For the arms I wanted to use bamboo, and much to my dismay there was no bamboo in KeyShot.  I used Oak, which was the closest looking material offered, and it doesn't look to bad.

Monday, April 21, 2014

Blake Stephenson: Week 4 Detergent Bottle


     For this weeks assignment I created a large detergent bottle.  I wanted to create a larger bottle because of the convenience of not having to purchase detergent as often.  This will also enable households that do a lot of laundry to more from the same purchase rather than buying lots of smaller boxes or bottles of detergent.
     To create this bottle I used many different commands.  To create the basic form I used Curve, PolyLine, and Sweep2.  Then, to add the details, I used commands like Offset, Scale1D, BlendSRF, FilletEdge, Pipe, Cylinder, Orient Perpendicular to Surface, BooleanUnion and BooleanDifference just to name a few.
     In KeyShot I used a teal hard rough plastic for the majority of the bottle.  However, I used a blue clear smooth plastic for the offset surface so that you can see into the bottle, and there will also be a label present on the transparent surface.

Monday, April 14, 2014

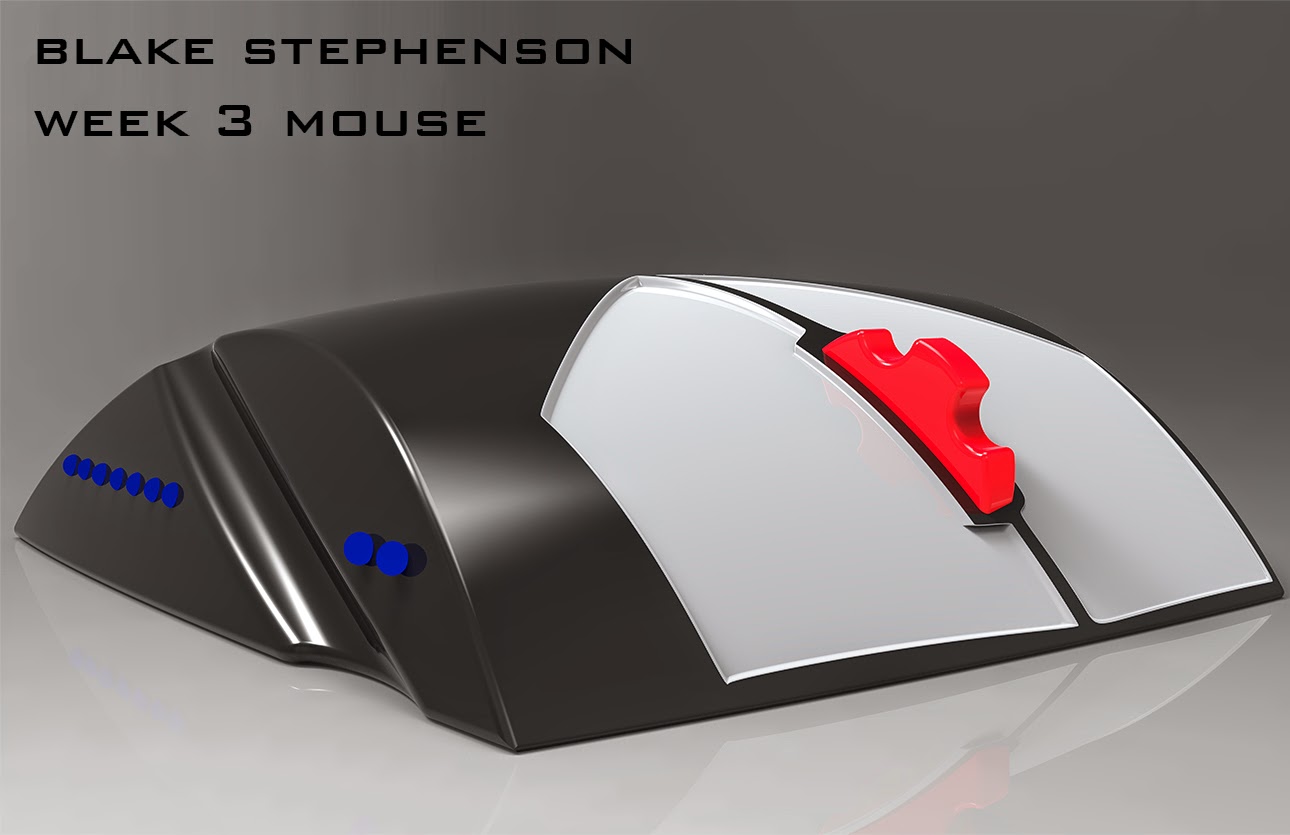
Blake Stephenson Week 3: Mouse


     My design inspirations for this mouse were convenience of a small USB wireless mouse and a trackball mouse.  I wanted to create something that had both of those elements because they both offer different advantages depending on what program you may be using and the amount of free space you have in your workspace.

     The commands I used were Loft, Sweep, CreateSolid, Boolean2Objects, BooleanDifference, Patch, ExtrudeCRV, FilletEdge, Move, Create Polyline, Create Sphere and BlendSRF.

     When I put my mouse into KeyShot I wanted to use materials that would be simple but stand out on a shelf at a store.  I used a hard black plastic for the majority of the house, but the spheres on both sides are little lights that emit a blue color.  The track ball and scroll wheel are red plastic to differentiate from the mouse as well.

Monday, April 7, 2014

Blake Stephenson: Week 2 Flashlight Sleeve


 Ghosted


    For my flashlight sleeve I just wanted to create a sleek design.  I wanted all of the elements to carve into the form instead of popping out the form.  I also wanted a defined grip that would allow for easy holding of the flashlight sleeve.

     The commands that I used to create this object were ExtrudeCRV, Boolean Difference, Revolve, Fillet, and I created some solids using the solids menu.

     The materials that I put on the object in KeyShot were shiny black plastic for the majority of the sleeve, a turquoise plastic for the spheres on top and a white light for the LED Blubs on the inside of the flashlight.

Monday, March 31, 2014

James Blake Stephenson: Week 1 Castle

Bird's Eye View

Pedestrian View
Ghosted Image

     My castle design was based off of my idea of a traditional castle.  An entrance, long hallway and then the main building of the castle.  However, being designed in modern times I felt that walls surrounding the compound was unneeded.  I looked at old models on the blog and found that I was much more attracted to simple models and simple castle designs when I was looking at reference images as well.

     The modeling techniques used throughout the design of my castle were Curve, ExtrudeCRV, CurveBoolean, Rotate, Copy, Explode, Join, Boolean Difference, along with a few others.

     The only material that I put on my model in KeyShot was matte grey.  I thought that with a more simplified traditional style castle a simple texture would suffice.  I tried putting stone on the model but I thought they were all to unrealistic to do this particular design justice.