Showing posts with label SCAD. Show all posts

Wednesday, May 7, 2014

Week 6 - Peyman Pirzadeh - Ring Project


For the ring project my inspiration was the military rings. Since SCAD doesn't have a graduation ring I decided to design and model a graduation ring for our school. 

So I started the modeling by making curves. In this part I only used circles for where the finger goes and the top of the ring. Then I had another curvy line and used Crv2view to shape my circle lines to the curvy line. Then I used Surface From Network of Surface to apply a surface on my curves. Then I used Rotate to rotate and copy one side to another so I would have my ring's body. Then
 I had other curves on each hole's side I used Sweep2 to make them a surface. Finally I used loft to create the inside part and to connect holes together. For the top part also I used a curve and a rail and had the command Railrevolve to make the curve a surface. Finally for the text on top I used LUV curves and FlowAlongSrf to apply the curve on my created surface.

For the Materials I used Matt Gold for the body part, Copper for the part under texts and leather for the stand. I also used HDR Office Environment image to get the reflection on my ring surface.

Thursday, April 10, 2014

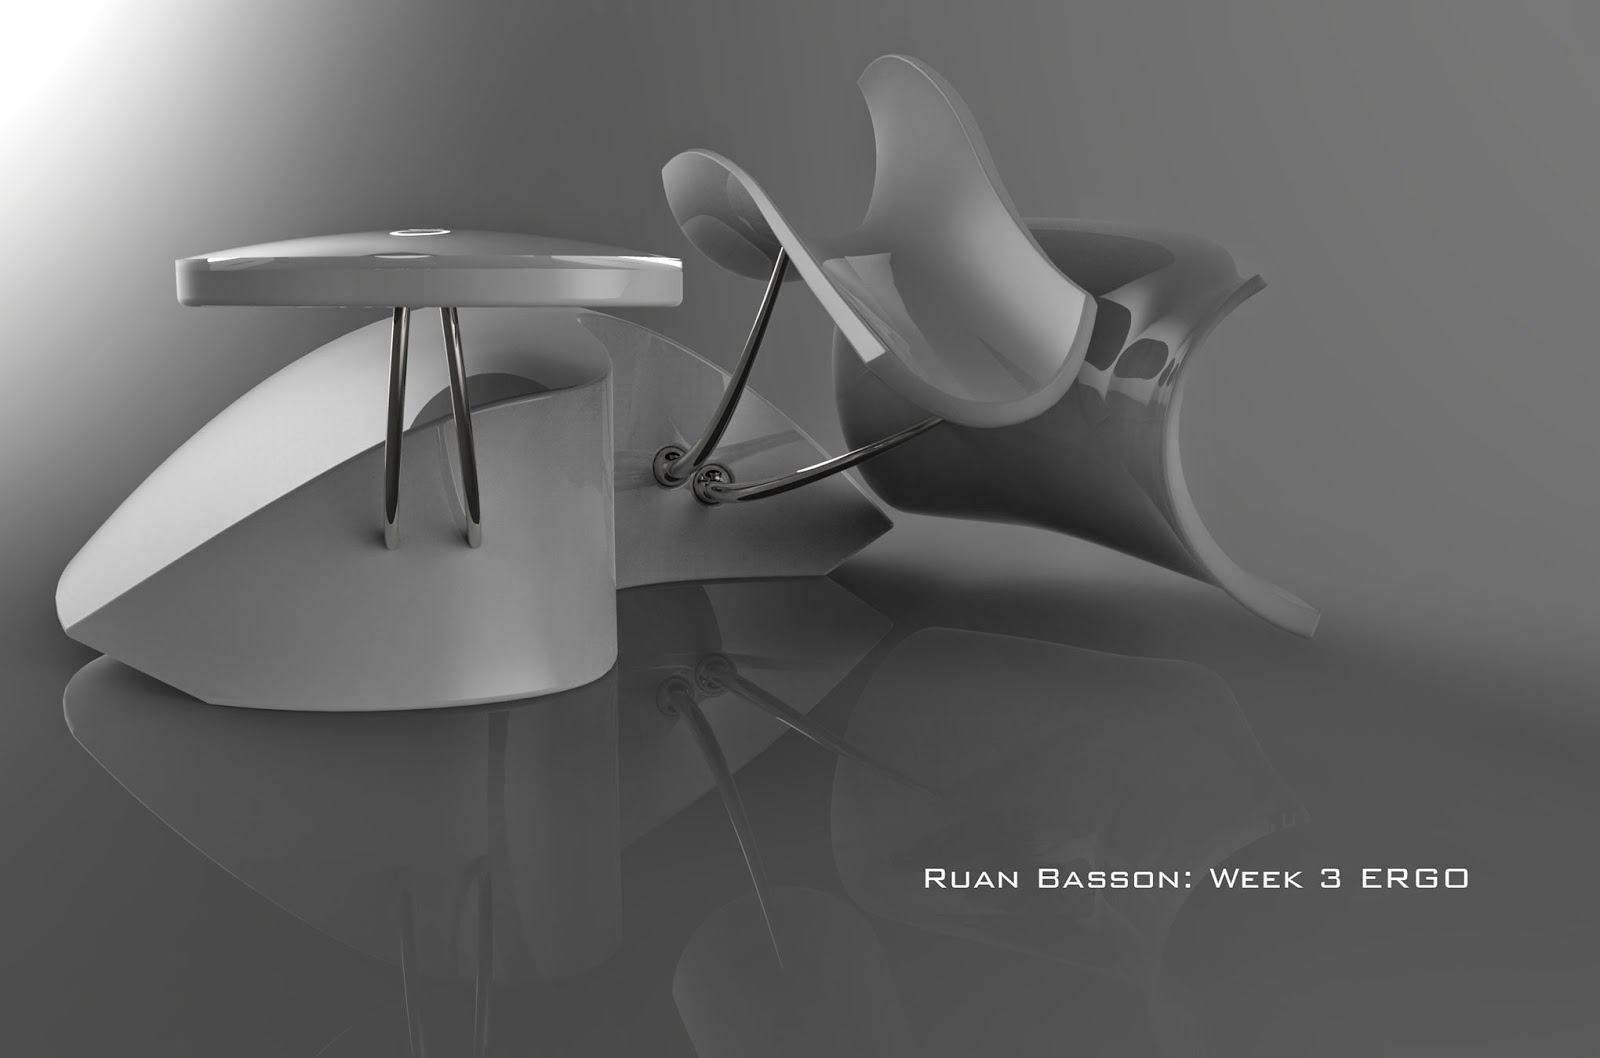
Ruan Basson: Week 3 ERGO

Ghosted

Elevated 3/4

Elevated 3/4 (opposite)

Ant View 3/4

The inspiration for this mouse lies in ergonomics.  I used this keyboard as a jumping board to figure the function of the mouse and how I wanted the user to interact with it.  I also wanted to keep a sleek and sinuous form while maintaining my minimalist aesthetic.  The pointer finger and thumb rests are actually the left and right mouse buttons.  To click one simply pushes down on the rest.  The elevated pad with the lighted rings is a capacitive touch screen to scroll and pan with the middle finger.  This rest is stationary and does not move.  To click one would simply tap twice and hold their finger on the pad the second time. I really enjoyed modeling this mouse.  

I used a lot of piping for the forms.  The forefinger and thumb are piped, then I projected a curve to cut them, scaled and copied the form and used Sweep2 to connect them (after making connecting segments).  The body was done the same way as in class, but I projected a curve to cut the shape to its final form.  The only edges I could not figure out how to fillet were the ones at the rear of the forefinger and thumb rests.

The materials I used were white plastic, titanium, and glass for the capacitive touch pad.  The forefinger and thumb rests are a soft plastic to add comfort.  I felt that the materials should be close to what they would be if the product was actually produced.  I feel this would also make it more affordable too. 

Monday, April 7, 2014

Parker Williams: Week 2: Flashlight


Ghosted Black Image


Front View


Rear View


 Introducing the K-Dub X 7 flashlight and taser in one. My dad was inspired by my dads insane collection of slick black tactical gear including machine guns, flashlights, and knifes. I had the idea to give it a unique tactical carbon fiber look with polished steel grips and spikes with a luminous red LED light inside. This weapon can be used one of several ways. It has side spikes and front spikes for stabbing, high powered LED light for stunning an enemy, and a 500,000 watt stun gun that runs electricity through the front end spikes.

 I started with two cylinders which I overlapped and did a Boolean difference on to create my one inch hole to tightly fit my flashlight down into. Next I used F10 to pull together the end to securely hold the light in without it falling out and hit F11 to escape the command. The tunnels around the edge to create the grip were created using the pipe command and using 360 to make it spin around the center snap to make it complete. To spin it around, I used ArrayPollar which was commonly used in this entire piece. The spikes were the easiest once I set them and Arrayed it, but because I didn't center everything properly on 0,0 I had to mess with a lot of different objects.

The spikes are just extruded pyramid shapes that I did a array polar on to perfectly make 4 symmetrical spike,m in two rows, at a 360 degree multiply to create all 8 on the side and same for the front, just with a few more smaller spikes. This project was really interesting because with the castle, it was all rectangles for the most part, and this whole project consisted of mainly cylinders. I really enjoyed it and glad I got to learn how to design this tactical self defense killing machine.


Tuesday, October 8, 2013

Christian McKenzie - Week 3: Hammer


For this assignment I thought a the classic squeaky toy hammer would be good reference. I wanted to make something that was menacing in a childish way. I also wanted to orient the toy toward a bit older kids and adults as a novelty.

Rhino Techniques:

  1. revolve: bopper
  2. Arc, tangent to curves : for the arcs on the claw
  3. 2 Rail Sweep: for the tang and handle
  4. fillet edges: to round out all the sharp corners
  5. Chamfer and Boolean Difference for the indentation in the handle, claw, and base
  6. Solid Text and boolean difference: for the text on the handle
  7. Mirror: for drawing symmetrical curves
Materials:

Soft tough: for the bopper (to make it look like it could give under pressure)
Clear rough plastic: the surface of the claw (I thought the translucency added a more quality look to the toy)
Shiny paint: all fillets except tang (to add playfulness like a lolli-pop )
Clear shiny plastic: tang
black rubber: handle (I thought this added some sophistication to the toy, so it might appeal to an slightly older audience)

Thank you,
Christian McKenzie

Wednesday, August 28, 2013

Aniela Chertavian - Week 10: Shoe


50 different styles


Keyshot Rendered View


Keyshot Rendered View


Keyshot Rendered View


Keyshot Rendered View


Keyshot Rendered View


Keyshot Rendered View


Keyshot Rendered View

-------------------------------------------------------------

NEW VERSION


Keyshot Rendered View


Keyshot Rendered View


Keyshot Rendered View


Ghosted Rhino View


Ghosted Rhino View

s t r u t was created to hold the foot snug while maintaining the proper arch (internal structure) and provide max comfort. There are no laces, no zippers, instead the top opening is elastic with two stretchable cuts. The base of the shoe and the heel are wood with rubber soles. The boot heel is designed to form to the foot and best of all there are plenty of styles to choose from! 
The design was inspired by Jeffrey Campbell's Lita Boot 

Thursday, August 22, 2013

Aniela Chertavian - USB


Ghosted Rhino View


Ghosted Rhino View


Ghosted Rhino View


Keyshot Rendered View


Keyshot Rendered View


Keyshot Rendered View


Keyshot Rendered View

The Flashy Flash is for those who like to store their computer data in style. Classy, compact, and realistic. I mean c'mon, it is a USB shaped like lipstick!!
Materials- mainly clear plastic for the lid, metal for the body, and metallic paint for the top.


Aniela Chertavian - Detergent Bottle


Keyshot Rendered View


Keyshot Rendered View


Keyshot Rendered View


Rhino Ghosted View


Rhino Ghosted View


Rhino Ghosted View

MIZZ BUBBLEZ is the best detergent around. With this exciting bottle design, laundry will ALWAYS be fun.
(This is not a gumball machine.)

Tuesday, August 20, 2013

Christina Byun : week 9 lamp

My lamp design, it is basic on the three circles that relates to one another. i wanted to create the pretty lamp lights coming out from the bulb, which i use the circle shape to give the atmosphere of the soft light. i opened the one part which easily can change the bulb inside. 

original view


orthographic
Ghosted
original shape

--------------actual model-----------

lights off
lights on