Showing posts with label 3D modeling. Show all posts

Wednesday, April 30, 2014

Week 5 - Project 5 - Sun Glasses - Peyman Pirzadeh


For the fifth project we had to design a sun glasses.In this project since I'm designing a product that is in relationship with eyes I was thinking about something in a same family. So I inspired by fly's eyes.

The process part was kind of easier that I thought.  I started with putting my sketches in background by using PictureFrame and then  making curves lined up with lines I had from my sketches. Then to curve my lines I used Crv2views and shaped my straight lines like curves. Then extruded them using ExtrudeSrf and ExtrudeCrv. At the end also used Mirror command to symmetrically build the other side. 

For the material, modeled leather is used for the temples, red rough plastic for the temple tips, glass for the glasses and plastic for its actual body.


Monday, April 7, 2014

Parker Williams: Week 2: Flashlight


Ghosted Black Image


Front View


Rear View


 Introducing the K-Dub X 7 flashlight and taser in one. My dad was inspired by my dads insane collection of slick black tactical gear including machine guns, flashlights, and knifes. I had the idea to give it a unique tactical carbon fiber look with polished steel grips and spikes with a luminous red LED light inside. This weapon can be used one of several ways. It has side spikes and front spikes for stabbing, high powered LED light for stunning an enemy, and a 500,000 watt stun gun that runs electricity through the front end spikes.

 I started with two cylinders which I overlapped and did a Boolean difference on to create my one inch hole to tightly fit my flashlight down into. Next I used F10 to pull together the end to securely hold the light in without it falling out and hit F11 to escape the command. The tunnels around the edge to create the grip were created using the pipe command and using 360 to make it spin around the center snap to make it complete. To spin it around, I used ArrayPollar which was commonly used in this entire piece. The spikes were the easiest once I set them and Arrayed it, but because I didn't center everything properly on 0,0 I had to mess with a lot of different objects.

The spikes are just extruded pyramid shapes that I did a array polar on to perfectly make 4 symmetrical spike,m in two rows, at a 360 degree multiply to create all 8 on the side and same for the front, just with a few more smaller spikes. This project was really interesting because with the castle, it was all rectangles for the most part, and this whole project consisted of mainly cylinders. I really enjoyed it and glad I got to learn how to design this tactical self defense killing machine.


Monday, November 4, 2013

Christian McKenzie - week 7: Lamp


When thinking of radial patters I immediately visualize fruit, watches, and mechanical components. I looked to these things to guide me in my design. I chose a strawberry and a sprocket. I added a perforated pattern as strawberries have seeds on the exterior, to keep the mechanical aspect I made these cutouts round. I came up with a basic gear design and filleted the edges in order to keep the organic properties of a fruit.

In Rhino I used the curve tools to make my horizontal intersections. I measured my hand and devised an interior circumference that seemed I could fit my hand into fit my hand into.  I made the curves into surfaces using the planar curve command in the surface menu. I made the outer curves of the vertical sections by using the horizontal layer for guidelines drawing in the front view. I used offset curve, array, and curve Boolean to make the perforation. I then used the polar array and planar curves to make my vertical intersections. I used pipes and split in order to make the notches in the sections.

In Key shot I chose wood for the vertical sections, I tried to enhance it by adding a bump pattern and making adjustments various adjustments mostly to the contrast, scale of the pattern. Wood has an organic warmth that this more mechanically arrangement needs. I then used a metallic paint on the horizontal sections. The metallic material as an accent puts more emphasis on the interior forms. Without the Metallic, the horizontal layers become easily interpreted as a cylindrical visual mass, or a heavy base, in the rest of the design.


Tuesday, October 8, 2013

Christian McKenzie - Week 3: Hammer


For this assignment I thought a the classic squeaky toy hammer would be good reference. I wanted to make something that was menacing in a childish way. I also wanted to orient the toy toward a bit older kids and adults as a novelty.

Rhino Techniques:

  1. revolve: bopper
  2. Arc, tangent to curves : for the arcs on the claw
  3. 2 Rail Sweep: for the tang and handle
  4. fillet edges: to round out all the sharp corners
  5. Chamfer and Boolean Difference for the indentation in the handle, claw, and base
  6. Solid Text and boolean difference: for the text on the handle
  7. Mirror: for drawing symmetrical curves
Materials:

Soft tough: for the bopper (to make it look like it could give under pressure)
Clear rough plastic: the surface of the claw (I thought the translucency added a more quality look to the toy)
Shiny paint: all fillets except tang (to add playfulness like a lolli-pop )
Clear shiny plastic: tang
black rubber: handle (I thought this added some sophistication to the toy, so it might appeal to an slightly older audience)

Thank you,
Christian McKenzie

Monday, October 7, 2013

Christian McKenzie - Week 3: Mouse


I wanted to make a mouse that would have the comfort of symmetry and a European feel. I was inspired by wooden barrels and the MINI cooper. I took two prominent aspects, the oval headlight and it's roof which is often segregated by a change in color or a design. I thought that a mouse would be comfortable if the scrolling button were on the side.

Modeling Techniques:
I used a combination of the techniques in the advanced mouse tutorial and the level 1 mouse tutorial.
  1. Loft: sides and top (I used curve to make simple curves arranged them along the appropriate axis)
  2. Mirror: side, buttons, and various curves (after creating the side loft to intersect the top loft, Mirrored it to create a symmetrical shape.
  3. Create solid (once I had the intersecting poly surfaces and cutting plane, I used this to create the basic solid.
  4. Filletedge ( Filleted all of the edges)
  5. extrude curve: buttons
  6. boolean intersect: buttons
  7. boolean difference: buttons and front split
Materials:
  I chose the materials as an alternative to the traditional plastic used to make the PC mouse.
  1. Plank wood: top and decorative top.
  2. Walnut: filleted sided and base and button accents
  3. Metallic paint Paint: buttons and fillet accent.
  4. Perforated leather: sided center stripe and top accent

Isaac Toonkel: Week 3 Mouse


For my mouse design, I wanted to create a sleek mouse. My inspiration came from a mouse made by BMW. I thought the fact the mouse was hollow was interesting but I wanted to show more of the internal circuits because I've always thought they were cool to look at. The materials I used for the mouse are a variety of plastics as well as aluminum because it is light weight. The middle section is made of a clear plastic to let the red light shine through and add to the aesthetics. To create this mouse, I mainly used the loft command and the blend surface command. 

Sunday, October 6, 2013

Isaac Toonkel: Week 3 Hammer


For my design, I wanted to create a hammer that could be versatile and used in what ever project you needed it for. The claw is similar to one you would find on a rock hammer used for breaking apart rock. The hammer features two nail removers to remove nails from tricky locations. The handle has a small angle in it to increase leverage and make your strikes harder. At the base of the handle is a strong magnet to pick up and dropped nails or metal scraps. The hammer is made of one solid piece of steel to maximize strength. The handle is made of rubber for extra grip and carbon fiber hexagon inserts to add style. To create this hammer I used the loft command to create a smooth transition from the neck to the cheek. I also used the boolean difference command to create the handle. 


Monday, September 30, 2013

Isaac Toonkel: Week 2 Duck

 Rendered Duck Decoy 1

 Rendered Duck Decoy 2


 Rendered Duck Decoy 3

Ghosted Duck Decoy Edges and Layers


For my duck inspired product, I created a Duck Decoy that would be used for hunting. I thought of the idea after talking to my Brother who works for a hunting club. The idea behind this design is that the decoy has a speaker in it that makes the duck call opposed to having to blow through a hand held duck call. I created the smooth surfaces by altering the control points of spheres. The decoy is made of plastic and has a hollow section as well as a keel to stay afloat.

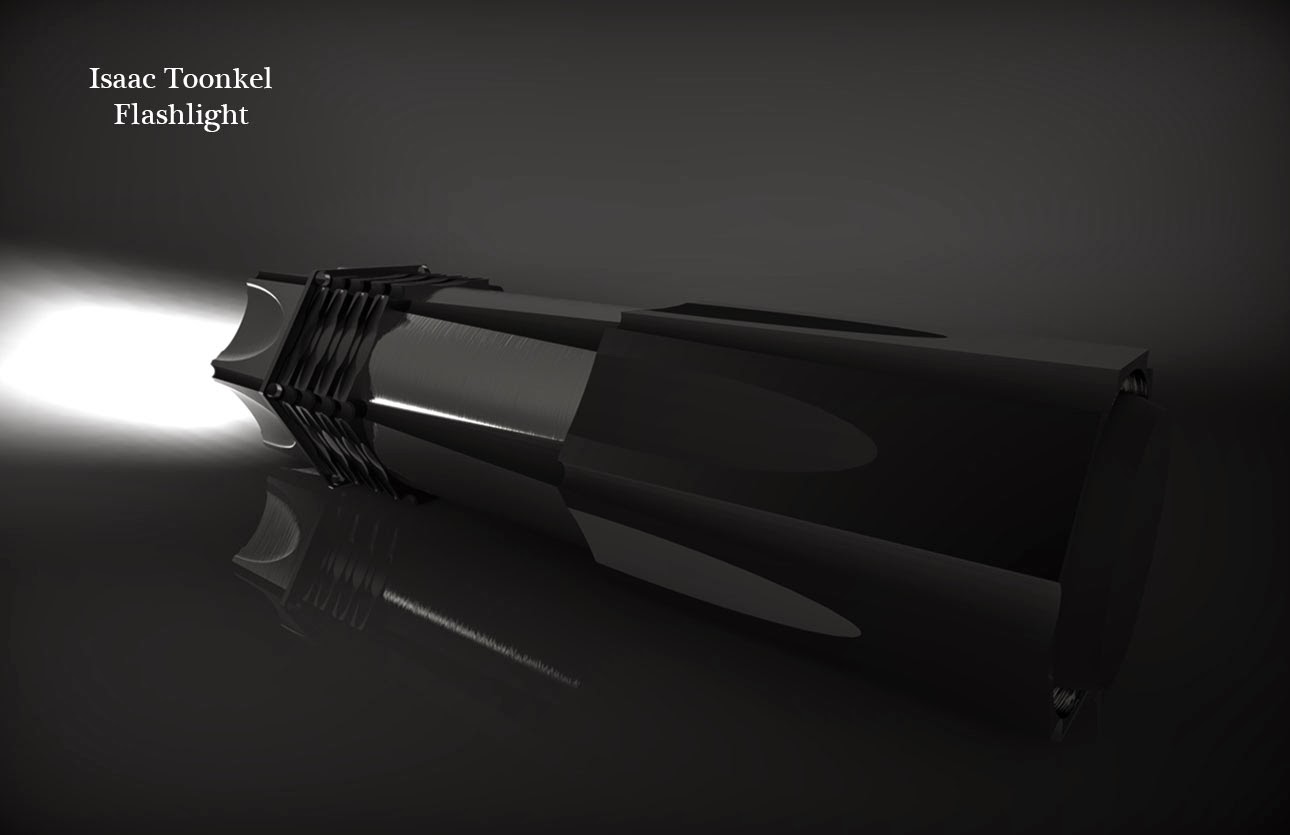
Isaac Toonkel: Week 2 Flashlight


 Rendered Flashlight 1


 Rendered Flashlight 2

Ghosted Flashlight Edges and Layers


3D model off


3D model on

For my flashlight, I wanted it to have a tactical feel to it. Not only does this style of flashlight look cool due to all of its angular forms, but is incredibly durable and bright. To create this flashlight I primarily used polar array and boolean difference. Because this flash light is intended to be durable, it is constructed out of stainless steel. It features a hexagon shaped body so it doesn't role away as well as several holes to attach it to a lanyard. 


Monday, September 23, 2013

Eris Muller: Week 1 Castle


Ghosted


Bird's Eye


Pedestrian

             Part of my inspiration came from my previous experience in art history last year. I learned to love and appreciate the certain aspects of roman temples. I am intrigued by the strict and organized structure and the balanced qualities that is seen in almost most roman temples. Concepts noted in the pillars and colonnade within the temple are taken from Nimes of France. Although it lacks the pediment, it has a roof that is repeated in the base. I decided to add a futuristic flare to the building by adding the spikes with floating spheres on top. 


ErisMuller Fall2013 ELDS205 Castle


Fabio Bonacquisto: week 1 Castle

I created this castle with inspiration from world of warcraft. Trying to recreate the feel of one of the major cities combined with the culture style of the environment. I used a lot of rounded shapes to create the feeling of tranquility just like the city in the game. I did used the Boolean difference tool a lot in the process of making this castle. My main goal for this castle was to get the visitor to feel extremely small in a large space but safe at the same time.

 Ghosted

 Birds eye view

 Pedestrian View

  Pedestrian Ground view


 Fabio Bonacquisto Fall 2013 ELDS 205 Castle

Sunday, September 22, 2013

Isaac Toonkel: Week 1 Castle

                                                                       Pedestrian View           

                                                                      Ghosted View

                                                                    Bird's Eye View

I've always been interested in medieval  times. Part of the inspiration for my castle came from the Conwy Castle as well as the Beaumaris Castle, both located in Wales. I also wanted to incorporate a castle town because they were common in medieval times. I liked experimenting with the wire cut tool to create intricate shapes such as the flying buttresses.

Wednesday, August 28, 2013

Christina Byun : Week 10 Camera

My camera design is basic on the general digital camera external design as, samsung camera, and nikon. i use the metal, plastic, glass, and light for the material, for the picture, it is my cute nephew. i used line tools to create the details, for intense, buttons and the button menus (light, menu, picture,and trash can, arrows) and extrude them to give 3d effect. also the ok button and on/off sigh, i use text tool and 'boolean deferent' . my original model is what i posted on very bottom, the ghosted viewed model, but i changed form several times for the details and filletEdges. 

-Black metal_ with picture-


-menu-


Ghosted view