Showing posts with label Christian McKenzie. Show all posts

Thursday, November 21, 2013

Christian McKenzie - Week 10: Laserscan


For this project I bought a cheap vinyl toy. I pulled it's head off for the scan. I thought it would be fun to model it into a  direct knock of a Kidrobot designer vinyl Dunny. http://www.kidrobot.com/  So i did and I named it Dummy. Laser scanning, I partnered with Mathew Grello.

I did an 8 veiw 360 scan of the object, then i did a bracket scan for a hole that wrapped around, then a did a single shot scan for a smaller hole. I then did an auto trim on the scans and aligned them. then i fused them. I then brought them into rapid works and ran a mesh repair wizard and filled any tiny holes that left in the mesh. Since the model wasn't very lumpy, but polished up anyway. I then used the solidify with a relaxed mesh and exported the model.

I traced the contour of the knob on the top that is used to hold on a head. and booleaned the model and the revolved surface together. I rebuilt and altered the controlpoints on a sphere to make the head and the ears, bolleaned them together and filleted the seam.

Christian McKenzie - week 10: Camera


I've known so many people who have bought ungodly good camera equipment, but they don't know what to do with it aside from pressing the capture button. So I decided to make a camera for them. the pretender looks like might be a professional camera, but actually it is a point and click for idiots who like the look of pro cameras.

I started by drawing base curves and extruding them. I drew a contour curve and extruded it. I trimmed the excess. I scaled the contour curve and hide  everything but the front surface and trimmed it. I then blended the surface. I brought back the side the rear surfaces then Piped and trimmed the them, and blended that. I drew a curve on the front and altered the control points so it wrapped around and used the pull command to bring it onto the surface, i then trimmed the surfaces. I drew a contour curve in the side view of how i wanted the cameras face to protrude and extruded it into a surface. Then scaled in 1 dimension the curve i used to trim the camera body, i did some control point editing and pulled the curve onto the extruded surface and trimmed the excess. I blended the body surface and the contour surface together using blend surface. I then brought in a bitmap image of the lens and traced it with curves, revolved it, used polar array to make little notches around it. Drew a top view curve to give the over hanging porting of the lens thing more interest. I used the curve to trim. The 2dscale the interior and blended the surfaces together.

In key shot i just used traditional materials seen on cameras.


Monday, November 11, 2013

Christian McKenzie - Week 8: Chair


Entente is defined as a friendly informal alliance between to social parties. The name seemed appropriate, I couldn't think of something more friendly then the agreement between my ass and a chair and there are those asses that seem quite stately(pun intended). I was initially draw to a bell form for the legs, it evolved naturally from there. I imagine this chair in the waiting area of an office. With the office in mind, I made the base of the frame flat laterally for the ease of aligning multiple chairs in rows.
I drew my initial inspiration for my logo from the Volkswagen logo (http://www.vw.com/en.html).

Modeling I drew the curves, tubed them, extracted the isocurves, trimmed and then used blend surface. I made a Y joint where the back and the legs meet. I made the cushions by using the planar curve command, rebuilt the surface, adjusted the control points, then used the bend tool to make the cradling contour of the cushions.
 For my logo, I used the same process, but instead of bend I used the cage editing tool in the transform menu.

Materials I chose leather and anodized chrome. I feel that is frequently desired in offices. It is easily cleaned and it is durable. 

Monday, November 4, 2013

Christian McKenzie - week 7: Lamp


When thinking of radial patters I immediately visualize fruit, watches, and mechanical components. I looked to these things to guide me in my design. I chose a strawberry and a sprocket. I added a perforated pattern as strawberries have seeds on the exterior, to keep the mechanical aspect I made these cutouts round. I came up with a basic gear design and filleted the edges in order to keep the organic properties of a fruit.

In Rhino I used the curve tools to make my horizontal intersections. I measured my hand and devised an interior circumference that seemed I could fit my hand into fit my hand into.  I made the curves into surfaces using the planar curve command in the surface menu. I made the outer curves of the vertical sections by using the horizontal layer for guidelines drawing in the front view. I used offset curve, array, and curve Boolean to make the perforation. I then used the polar array and planar curves to make my vertical intersections. I used pipes and split in order to make the notches in the sections.

In Key shot I chose wood for the vertical sections, I tried to enhance it by adding a bump pattern and making adjustments various adjustments mostly to the contrast, scale of the pattern. Wood has an organic warmth that this more mechanically arrangement needs. I then used a metallic paint on the horizontal sections. The metallic material as an accent puts more emphasis on the interior forms. Without the Metallic, the horizontal layers become easily interpreted as a cylindrical visual mass, or a heavy base, in the rest of the design.


Thursday, October 17, 2013

Christian McKenzie - week 5: eyeglasses


     After reading a new book by one of my favorite sequential artists/designers Paul Pope, I was reminded of a simple glasses design he, Pope, did for a character named Kim in one of his books titled "100%". This design served as inspiration for my design in that the lenses were not completely framed.  A page with an image of the character, Kim, wearing her glasses can be viewed here http://pipocaenanquim.com.br/wp-content/uploads/2011/03/Paul_Pope_-_100_01_p030.jpg
    I thought about wearing my sunglasses and how uncomfortable and sore they make behind my ears. This in mind, I decided to design my glasses so they would have a flexible prongs with a swishy non-slip silicone at the end. The prongs could also be adjusted to a desired tension for security on your head.

Rhino techniques:

Curve from 2 views: for all of the initial curves. lenses, frame.
Curve network with offset surface: to make the lenses.
Blend Surface: to make the desired curvature of the frame and to connect the frame to the prongs and to pretty much smooth everything out.
Sweep2 rails: to make the prongs
Revolve: to make the squishy cushions things the ends of the prongs.
Boolean difference: to set the lenses into the frames

Materials.
soft shiny black plastic: I chose for the frame
translucent blue plastic. in the crack of the lens for some detailing
solid glass: for the lenses
human skin: for the squishy grips


Tuesday, October 15, 2013

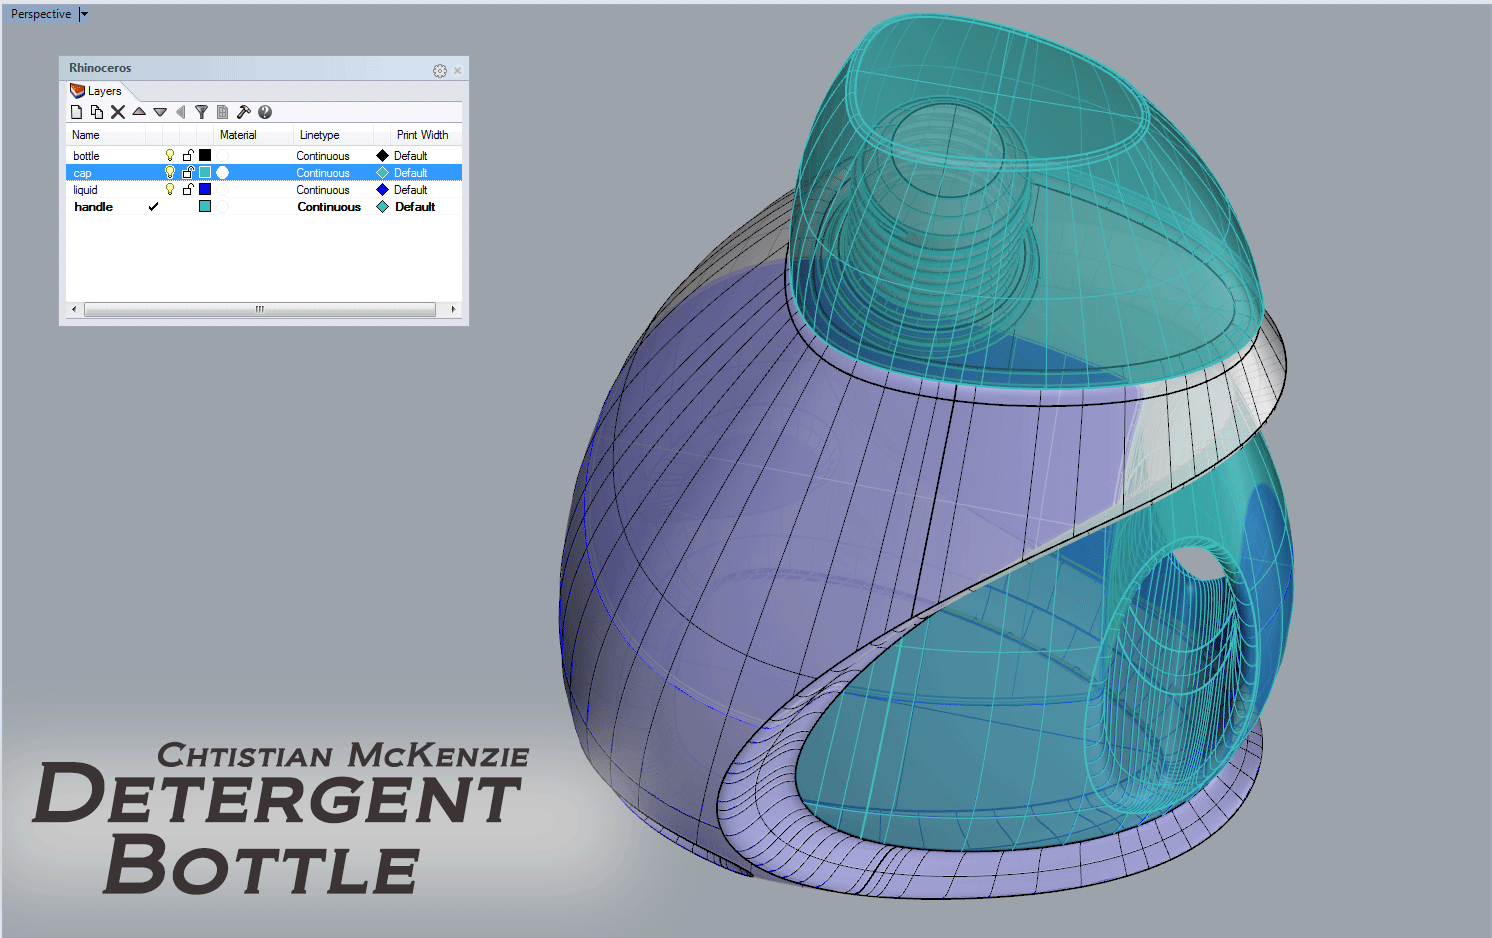
Christian McKenzie - Week 4: Detergent Bottle


 Bottles like this always remind me of the "Beetles Yellow Submarine" cartoon. Only a small amount of that influence came through in the design. It was definitely why I put some port holes at the base.

Techniques:

Sweep 2 rails: used to make the body and the cap
Offset surface and Blend Surface: the handle, the base, and the port holes (offset surface used to make fluid)

Materials:

Rough plastic: body
Rough clear plastic: cap, portholes, and handle
wavy glass: fluid
Label: option in keyshot


Christian McKenzie- Week 4: USB


 I thought having a nice little strap on the back would be nice. Most drives I have seen only have a little nylon string and a jump hoop to attach it to whatever. I have put an integrated strap on the back.

Techniques:

Offset surface and blend surface: for most of the details
fillet edge: when i didn't use blend surface
Extrude curve: for the majority of the forms
Boolean Union: to merge the forms

Material Choices: I wanted to keep it high tech.

Blue rough glass: for the lights
grey leather: I shifter the color to black and increase the shine
Soft black: logo
Galvanized metal: for the body

Thank You,
Christian McKenzie

Tuesday, October 8, 2013

Christian McKenzie - Week 3: Hammer


For this assignment I thought a the classic squeaky toy hammer would be good reference. I wanted to make something that was menacing in a childish way. I also wanted to orient the toy toward a bit older kids and adults as a novelty.

Rhino Techniques:

  1. revolve: bopper
  2. Arc, tangent to curves : for the arcs on the claw
  3. 2 Rail Sweep: for the tang and handle
  4. fillet edges: to round out all the sharp corners
  5. Chamfer and Boolean Difference for the indentation in the handle, claw, and base
  6. Solid Text and boolean difference: for the text on the handle
  7. Mirror: for drawing symmetrical curves
Materials:

Soft tough: for the bopper (to make it look like it could give under pressure)
Clear rough plastic: the surface of the claw (I thought the translucency added a more quality look to the toy)
Shiny paint: all fillets except tang (to add playfulness like a lolli-pop )
Clear shiny plastic: tang
black rubber: handle (I thought this added some sophistication to the toy, so it might appeal to an slightly older audience)

Thank you,
Christian McKenzie

Monday, October 7, 2013

Christian McKenzie - Week 3: Mouse


I wanted to make a mouse that would have the comfort of symmetry and a European feel. I was inspired by wooden barrels and the MINI cooper. I took two prominent aspects, the oval headlight and it's roof which is often segregated by a change in color or a design. I thought that a mouse would be comfortable if the scrolling button were on the side.

Modeling Techniques:
I used a combination of the techniques in the advanced mouse tutorial and the level 1 mouse tutorial.
  1. Loft: sides and top (I used curve to make simple curves arranged them along the appropriate axis)
  2. Mirror: side, buttons, and various curves (after creating the side loft to intersect the top loft, Mirrored it to create a symmetrical shape.
  3. Create solid (once I had the intersecting poly surfaces and cutting plane, I used this to create the basic solid.
  4. Filletedge ( Filleted all of the edges)
  5. extrude curve: buttons
  6. boolean intersect: buttons
  7. boolean difference: buttons and front split
Materials:
  I chose the materials as an alternative to the traditional plastic used to make the PC mouse.
  1. Plank wood: top and decorative top.
  2. Walnut: filleted sided and base and button accents
  3. Metallic paint Paint: buttons and fillet accent.
  4. Perforated leather: sided center stripe and top accent

Tuesday, October 1, 2013

Christian McKenzie - Week 2: Duck tutorial


I took inspiration for this project from a designer named Mr. Clement (http://www.mrclement.com/gallery/sculpture/). The perfume bottles. After watching the Rhino thread making tutorial I thought if I put the threads in the center of the models head it would look like a brain and that the model would be an interesting shape for a bottle.

Rhino Techniques and tools used:
  1.  Rebuild (To add more AV curves and controls point to the solids)
  2. Transform (set xyz coordinates (to flatten the base and sides of the solids)
  3. Project
  4. split (to out the various sections)
  5. Offset surface (to generate the interior)
  6. orient on surface(for the wings and the eyes and curve on the helix)
  7. Helix (for the threads)
  8. rail sweep(for the dimension of the threads on the helix) 
  9. cap (to close poly surfaces into solids)
  10. 2d and 3d scale (to size the threads and insure the screw and cap were functional)
  11.  Blend surface (to merge the solids into poly surfaces)
Materials:

  1. Clear Rough textured plastic: wings, legs, eyes and cap. ( I wanted to have some various textures as I intended the majority of the surface to be translucent.
  2. Clear shiny: head and body
  3. leather: for the grip( the texture next to the shiny and rough plastic is a nice contrast and breaks up the  dominantly translucent surfaces)
  4. Shiny clouded plastic: beak and threads ( keeps a nice continuity to the surface rather than an abrupt opaque solid paint) 
  5. Wavy Glass: fluid (   it looks like a convincing fluid I increased the scale of the wave texture.)
Enjoy,
Christian McKenzie